How to Plan Your Garden, Part 2
Were you as inspired as I was by Shannon’s post on Tuesday? I completely understand what she means about becoming more and more excited each year as she considers what she can grow and preserve. I feel the same way. Spring is positively pregnant with possibility when it comes to envisioning my garden and what we will eat from it.
With that in mind, let’s continue to talk garden planning. Last week I went through the initial steps of determining what you want to grow and how much of it you want to grow. Today we’ll continue to make it super practical by talking about space and layout considerations, and how to know what to put where.
Step 3: How much space do you have?
My calculations in Step 2 quickly begin to beg the question, just how much growing space do I need to grow what I want?
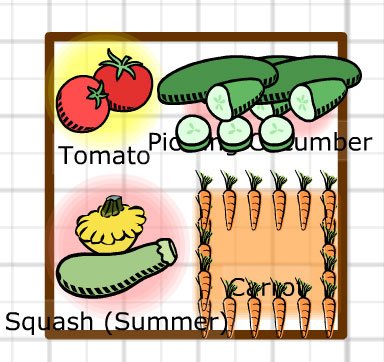
For this step, it’s crucial to know how much space each vegetable requires. For example:
- A tomato plant needs at least a square foot, but usually closer to 2 square feet (based on growing them vertically, not letting them sprawl).
- In 1 square foot, you can also grow about 16 carrots.
- 1 zucchini plant also needs about 2 square feet.
- You can grow two cucumber plants (vertically) side by side in 1 square foot.
To learn what each crop requires, there are a number of ways of going about it. One is simply to look on your seed packet, since many of them tell you the spacing on the back, along with other important information about that particular crop. Or check out one of these helpful articles: Intensive Spacing Guide, Plant Spacing in a Square Foot Garden, or Vegetable Spacing Guide.
At this point, what you need is a map of your garden. I have often just sketched mine on paper, plotting out the spacings approximately.
Though this works, an even better way to do it is to have a to-scale graph of how much garden space you actually have, so that a one inch square on your paper equals one square foot in your garden. This lets you plan things out in an accurate way. For those using raised beds or containers, here’s a link to some garden planning resources that includes a Square Foot garden planner and a Container planner.
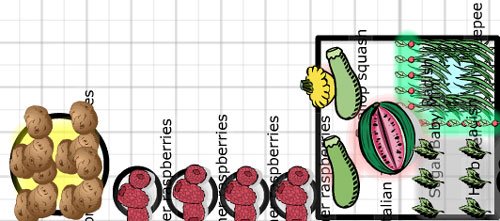
Another option is to try making a map of your garden or backyard as I did, using the site GrowVeg (which is where my images in this post and last week’s post came from). A bonus is that it has vegetable spacing automatically built in so you can easily see how much space each crop takes, although I find a few of the spacing settings to be larger than how I usually plant them.
They have a 30-day free trial and for those of you who are very visual, as I am, I think that you’ll find it really handy to see such a clear picture of how your garden will look during summer’s peak, when everything is big and bushy, as opposed to trying to imagine it when you’re putting teeny seeds or seedlings into the wide open dirt in spring.
Once you know your crop spacings…
Based on what you think you’d like to grow, and how much of it you’d like to grow, start filling in your garden map (start in pencil, or print off several pages so that you can make a draft and then a final copy), just to get a feel for how everything fits in. Don’t worry yet about which crops should go beside each other, or which ones do best vertically or in shadier spots. That comes in a moment.
Plot your crops onto the map by priority. By this I mean that if you listed tomatoes as the crop that is most important to you, plan your tomato growing spaces first. It’s like the concept of big rocks and little rocks in your personal schedule. Put what’s most important in first, and then let the things of lesser priority fit in where they can around the important ones.
Go down your list one by one, filling spots in and crossing the crops on your list off. You won’t get through them all, most likely, and that’s why you do it in order of priority. The goal right now is simply to see how your desired crops will fit into the garden space that you have available.
In my current garden, potatoes get relegated only to being grown in a garbage can with no actual garden space. I’m growing barely any winter squash due to lack of sprawling room for the vines. I’ve ditched onions completely because I’ve never had huge success and I can readily buy affordable organic onions. I probably won’t grow any turnips or parsnips (not my family’s faves anyways), my radishes get tucked into little spaces here and there because they’re small and forgiving, and I’m going to have to try most of my herbs in containers or in the front yard. That’s ok, though, because my most important crops are getting the space they need.
Step 4: Determine what goes where.
This is where the pencil really comes in handy. You’ll want to start trying out different spacings and arrangements of your crops.
Things to consider:
Tall crops next to shorter crops. Foe example, it might be good to put shade-tolerating lettuce next to tall tomatoes plants to prevent bolting in the summer heat, but your sun-loving summer squash or herbs might not be quite as thrilled if the toms are blocking out all their light. If you’re using boxes or your garden has a fence along one edge, it’s often a good strategy to place your taller crops towards the back and shorter ones towards the front.
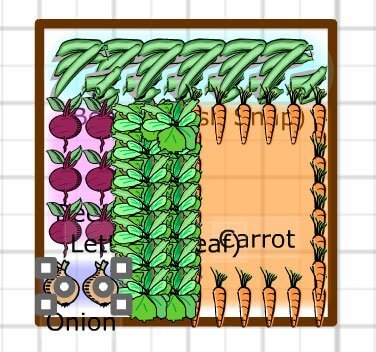
Full sun vs. partial sun. If you have some parts of the garden that receive less sun than others, you’ll want to use those for shade-tolerant crops (all greens, peas, carrots, etc.) and keep the sunniest real estate for the pickier crops (tomatoes, cucumbers, peppers, squash).
Ease of gardening. If you put your tomatoes or pole beans at the back along the fence, in behind a bunch of leafier crops, will you be able to get in there to harvest them properly? You might, if you have good side access and the bed isn’t too wide, but just try to envision what your access will look like when things are big and bushy in mid-August.
Succession plantings. If you’re hoping to do a second planting of some of your crops, like my plan to put in cabbage for the fall when the garlic finishes up in early July, you’ll want to have those plans in your mind as you select crop locations for the spring and early summer.
Companion planting. Though I haven’t personally found this to be a really important part of my decision-making process (because I’m not as convinced of it’s importance as some other gardeners are), you might still want to consider which plants would benefit from being closer to (or father away from) others. A good resource for learning more is the book Carrots Love Tomatoes.
Crop rotation. It’s best not to plant the same crops in the same place, two years in a row. Keeping your garden records or maps from previous years is helpful so that you can ensure things get moved around, to prevent recurring disease issues, too much nutrient-loss to the soil, etc.
Aesthetics. I’m a pretty pragmatic gal, so I personally don’t care how nicely laid out my garden is, so long as I get a good harvest. But some of you do care how it looks, and if that matters then you should try to lay things out in a way that looks pleasing to you.
Just give it your best shot
Remember, there’s no right or wrong way to arrange your garden. I used to sketch and re-sketch my garden, trying to come up with the “perfect” layout. It doesn’t exist. Especially if I’m rotating my crops, because I’ll find a layout that really works, only to have to change things up again next season.
Don’t let a desire for that “perfect” layout drive you crazy or paralyze you. Most veggies will still grow pretty well even if you make a few mistakes in where they go. Practice makes things better, and we all learn as we go, but you can still have garden success even if you’re mostly guessing what should go where.
What have you planned for this year’s garden? How did you make your decisions about what you would grow and where to put it?
Other Related Posts You May Enjoy
- How to Plan Your Garden part one
- A Tale of Two Gardens part one and part two
- Organization in the Garden: Evaluating What You Have and What You Need
- Getting Organized in the Garden: Seed Starting and Planting Schedule
- Naturally Controlling Pests in the Organic Garden
- 5 Steps to Being a Lazy Gardener
- Gardening in Less-than-Ideal Spaces
- 7 Gardening Lessons from a Novice Gardener
- Selecting Seeds for Garden Success
- Gardening with Herbs 101: Where to Begin
- Gardening with Herbs 101: What To Grow
- How to Plant a Garden that Works for Where You Live
- 7 Reasons to Square Foot Garden
- Plan & Plant Now for Sustainability, Freedom, and a Backyard Revolution

I just adore these articles, Im a 3rd year gardener, but my family has gardened all their lives. I have had a great time trying new things and this year Im doing raised beds in tractor tires. Im really trying to use some of the square foot gardening ideas, but with a circle it’s not as easy. Im going to try some lasagna gardening and companion planting. I used excel to mark out what Im going to put where and for the first time I know in advance when & where everything is going. So excited! I’ve been starting seeds all over in the house and have a pan of lettuce Im growing to see if I can get to make it all the way through right there in the window. So far so good!
I will definitely pass this article on to my husband. He is the head gardener and I am the assistant. 🙂 He loves it and I love the idea of it, but I’m not a big fan of being outside in the heat of summer. I guess I will have to get over that! Thanks for sharing!
You may not care about aesthetics, but those seriously cool maps prove otherwise! I want to make one just for the fun of it. 🙂
@Hannah, I know, they are totally cool and they do make me happy to look at. 🙂
I have used http://www.gardeners.com/on/demandware.store/Sites-Gardeners-Site/default/Page-KitchenGardenDesigner or an Excel spreadsheet to organize my garden. Both work well, but there is also nothing wrong with using graph paper and colored pencils if you prefer a more hands on approach.
@Laundry Lady, I just used the gardners.com site to plan our first real garden. We’ve lived in an apartment the last few years and had a few containers. This year I’m *determined* to have a successful garden (even though I’m expecting a baby in early august). I’m trying to keep it small so that I can make sure I’m successful and don’t get too frustrated or overwhelmed. I’m also looking for a CSA since we won’t be self-sufficient. All that to say: the gardners.com planner was very helpful, and I would definitely recommend it to other beginners.
I recently found this blog and this series is full of great encouragement and tidbits. Makes me even more excited about our garden this year!
I recently found this blog and this series is full of great encouragement and tidbits. Makes me even more excited about our garden this year! Since this will be our first garden in our new home, we’re keeping this pretty simple. In our garden, we tend to focus on crops that keep producing throughout the season.
@Lara, I think it’s great to focus on things that will keep producing. Now that I have some raised garden beds, I’m planning to do a bit more of that, although I still really enjoy growing summer crops and preserving as well.
I am trying out a SFG this year for the first time at our new house. I’m trying to figure out how to do potatoes, though. Where did you learn how to grow them in the garbage can? Has that been successful?
@Kristen, I think I first got the idea from Heavenly Homemakers. You can read more about how I did it here:
https://keeperofthehome.org/2009/04/planting-potatoes-pitchforks-and-other-fun-things.html
It has definitely been successful. Of course, it depends on me and how diligent I am to keep filling the can up with dirt. Overall, I have been pretty happy with the amount that I grew in just a garbage can. I’m tempted to do two cans this year, since I still lack the garden space to put them in the ground.
Another excellent article. On the matter of companion planting, it may or may not be that important — but in our small garden beds, we have seen the difference between doing so and not doing so. When we can, we definitely choose to utilize this method since it has proven itself over the years for our small raised beds.
Hi Shannon,
As a first year vegetable gardener I so appreciate your helpful tips. I just made a list of what we enjoy eating and laid it all out on excel. We are doing a combo of raised beds and traditional rows, seeds sown directly in the ground and purchased vegetable starts. Since it’s been so cold here in NJ ( weather reports is calling for more snow tonight, ugh!) our community garden decided to delay their opening until the end of the month. I can’t wait to get started! Thanks again for a great post.
I’m not sure if I am doing my own garden yet or not, but I do already have a list of the things I want to preserve this summer (my list gets bigger every year!) whether I get it from the farmers market or go to u-pick farms, etc. 🙂 But I will definitely keep this post in mind if I decide to try it out this year!
@Michelle, My list also gets bigger every year! 🙂
We just expanded our garden, and I’m so excited about trying some new crops this year! I second the idea about planting lettuce in the shade of tomatoes. I had lettuce until the end of June (in zone 7!) last year, and the only reason it stopped is that something came in the night and ate it all up. And if you don’t want your zucchini to overproduce, DO plant it in the shade of tomatoes. 🙂
I didn’t know that we shouldn’t plant the same in in the same spot so that means I have to go back to the drawing board and redo most of it. But I’m assuming I can’t move my strawberries since they’re still in our SFG boxes and looks like they will continue to produce. But I thought there were certain things you couldn’t plant where other certain plants were. Something like don’t plant something in particular where the pumpkins grew the previous year, can’t remember what my friend told me 10 yrs ago. I would LOVE To know if there is a resource for that?
Succession planting is key. If you run into problems with on batch of plants, you have time to adjust with the next batch. This diversifies your risk when it comes to your vegetable garden. I also like to add mulch to raised beds for a variety of reasons. Mulch keeps your raised beds moist and reduces the amount of water you need to use. But it also has some little known benefits, too.
I’ve read that you can make up for nutrient-poor soil by spacing your plant more generously and mulching in between plants. I read about it in The Resilient Gardener by Carol Deppe. What do you think about this?
@Bill Brikiatis, I have definitely read that doing that helps with drought conditions, and it makes sense that it would help with low nutrients as wel. Less competition, and more retention of the nutrients that actually are there, right? At present, I am having to deal with how I have already planted things, and I just continue to amend and fertilize as much as I can, which is at least keeping things healthy and growing, albeit slower than I would like.
That makes sense to me. Top dressing with fertilizer or compost can help a lot.