A Tale of Two Gardens: Part 2
By popular demand, I decided to run the second part of this post right away. The suggestions are so valuable, and having gardened myself for 3 years now, I can definitely attest to the wisdom in these tips. I know that I’ve been encouraged and reminded of areas where I could improve my own gardening and make it easier for myself, so thanks Amber!
*******
Guest Post by Amber
Continuing on from Part 1…
#1 Start Small
Yes, I know; do I have to spoil the fun? “Start small” is really hard to remember when you’re pouring over seed catalogs in January! Those 400 feet of corn don’t seem so long, and surely you’ll need at least 5 zucchini plants, right? Perhaps if you lived away from all contact with civilization, or grew vegetables as a business, you could handle that garden you’re dreaming of, but most of us have other things to do with our lives. We can’t spend 4 hours a day on garden maintenance.
So be realistic. Of course, if you’ve never gardened before, it will be hard to judge what’s realistic. For example, unless you’ve heard from gardening friends, you won’t know any better than to plant those 5 zucchini plants to feed your family of 4. (You’ll have zucchini coming out your ears!) I suggest finding some gardening friends. They’ll warn you about those crops which are more difficult to grow, and give you a good idea of how much you’ll need to plant. It’s always better to get a pleasant experience this year, and increase your gardening next year, than to be overwhelmed this year and never garden again.
Container gardens are also a good way to get a taste of gardening. Go for a pot with a tomato plant in it (make sure it’s deep enough!) or a rubber-maid tub full of dirt and a crop of bush beans. Here’s my tub of butter crunch lettuce – it fed us April-June of this year:
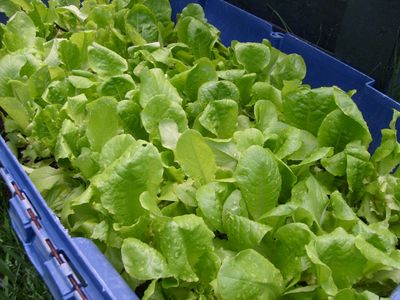
There’s nothing like going out and picking your salad five minutes before you eat it!
#2 Go Organic
Let me contradict one very important myth; that organic gardening is the hardest kind to try. Nothing could be further from the truth. Organic gardening is a lot like eating healthy. It may require a little more work in the beginning, but in the end it will save you hours and hours of time in the doctor’s office or on the sidelines when you could be living a more vibrant life. Organic gardening takes a little more “oomph” when you’re starting out, but eventually it will save you endless work and frustration.
The trick to organic, labor-reduced gardening is letting God’s nature do more and more work for you. You will waste hours and hours of work trying to go against what God built into a plant naturally
“Feed your soil, and your soil will feed the plants, and your plants will feed you.”
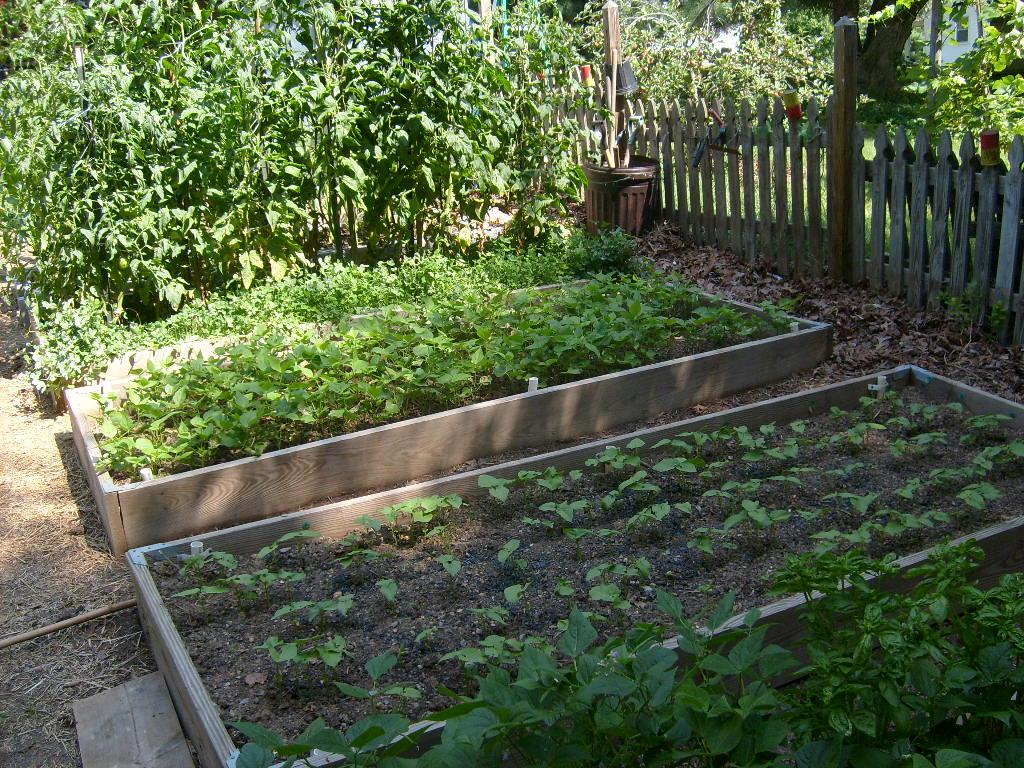
You thought I was going to say something about taking care of the plants, didn’t you? Really, God made the soil to naturally take care of the plants. Good soil makes plants resistant to disease, bugs, and drought. If you have good soil, basically all you’ll have to take care of is pruning, tying, and picking, with a little weeding and watering here and there.
This concept is probably the most important thing my Dad has taught me about gardening. Pouring chemicals onto plants will give you sick soil, and eventually make you more work, but using organic methods to build up the soil will give you better and better plants each year. When you can get your brain geared into thinking about soil care instead of plant care, your work load will decrease like bathtub water going down the drain. It’s so simple it’s almost funny!
Good soil isn’t common in my part of the country. We have red clay here! But you’d never know it, looking at the “brownie mix” in our beds. That soil was built up over a 20-year period. Surprisingly, though, most of the change has happened in the last couple years, as Dad has started focusing more and more on soil improvement instead of plant care. You can improve your soil too, and you may start seeing results in as little as one year. There’s hope for any soil!
Don’t just avoid harmful sprays – learn to feed your soil beneficial things. Get into the mindset of thinking of your soil as living. It
should be living; it should be packed with beneficial organisms that break down organic matter and help plants absorb nutrients. That topic is much too vast to get into in this post, but if you’ll take the time to research how to feed your soil, you’ll have a garden that practically takes care of most problems for you.
#3 Use Cover Crops
For this tip, I’d love to use neon lights and make a big flashing sign that says “TIMESAVER!” This is the secret to almost eliminating the hours you spend weeding.
Cover crops are plants you sow “underneath” your main crop, to add nutrients to the soil, and to cover up bare soil. Bare soil is
against nature! Have you ever noticed how weeds love to grow in bare spots? If you leave the space underneath and between your plants empty, guess what’s going to fill in those bare space? That’s right: weeds.
You don’t want that – weeds steal nutrients and look awful. But don’t try to maintain that bare soil; you’ll be fighting against the whole of nature, and will waste a lot of time. Instead, plant something beneficial there. Crops such as clover, buckwheat, winter rye, and alfalfa all add nutrients to the soil, and prevent the weeds from taking over.
Right now we have a lovely thick carpet of clover about a foot high growing under our tomato plants. It’s soft and pretty, and I can count on one hand the number of weeds I’ve had to pull from those beds this year. When the growing season is over, we’ll till the clover into the soil, and let it compost there.
Mulch made from grass clippings or leaves also works on the same principle as cover crops. An added benefit of these is that they are feeding the soil as they slowly decompose. It’s a steady feeding that – unlike powdered fertilizers – won’t be washed away deep into the soil where plants can’t reach it.
#4 Choose Your Plants Wisely
Some plants are just easier to maintain than others. Lettuce is super easy – just plant it and pick it. Bush beans require little or no maintenance when they’re growing, but they do take a lot of time to pick. Cucumbers are easy to pick, but they produce best if they’re up on a trellis, and that takes a little time to put together. Tomatoes are the most popular plant among American home gardeners, and are known for being heavy yielders, but you’ll have to spend some time tying them to poles, or making cages for them. That can get time-consuming, especially if you have 8+foot-plants like ours! But to us it’s worth it because of the tremendous yield (and the dropped jaws of folks who see our plants).
Sit down and figure out just how much effort you’re willing to spend on your garden, and be sure to match plants accordingly. Looking through a few gardening books (look for “organic” and “intensive planting” gardening books) should give you an idea of how much time you’ll have to spend on each kind of plant. Don’t plant potatoes if you don’t have time to hill them up, or asparagus if you can’t pick it quickly enough to keep it from going to seed!
#5 Schedule Time
Don’t just hope you’ll get around to gardening when you have a free moment. Free moments don’t happen very often – certainly not often enough to upkeep a garden! Having a garden is a little bit like buying a dog; don’t just “get” one, then stick it in the backyard kennel all day. Schedule times to work in the garden, just like walking the dog or making dinner. Habit makes everything go smoother.
If you let your garden go for two weeks, and then try to do all that work in one day, you will have more than you can handle. You’ll become frustrated and wonder why you ever planted a single seed. If you set aside just thirty minutes – or even ten minutes – every day, that’s probably all the time you’ll need to spend out there, except for when you’re planting seeds or picking produce. Garden maintenance shouldn’t have to take up all your time.
I like just about everything about gardening but, like most of you, I don’t have all day to spend in the garden – even though I’d enjoy it. I find that I usually get out there to work every other day, for 20-40 minutes. That’s all. It’s enough time to turn the compost, pull a handful of weeds, prune and tie the tomato plants, check to see what needs to be picked, and do some watering. Some days I don’t even do all that.
Of course, our garden is a fair size (not in mere physical size, but in the amount of vegetation contained in it). Many of you could start on a much smaller scale and only spend 10 minutes a day on upkeep. Gardening in containers is even simpler. Having easy access to your plants will encourage you to be consistent in taking care of them. Keep that in mind if you’re selecting a garden space.
#6 Get the Whole Family Involved
I feel like snickering as I write this. I could say this is the whole secret to our beautiful garden – not cover crops, or raised beds, or plant selection, but family involvement! If I was the only one gardening, that place would not look the way it does now. Many hands truly makes lighter work.
Dad is definitely the garden manager, and we wouldn’t get far without him. But he has to go to work every morning and, even with all the free time he spends in the garden, I know the help the rest of us give is important too. I have a mother and five siblings, and we all help in the garden in some sort of way. We all spend different amounts of time out there, because some of us are more passionate about gardening than others, but everybody does something.
Our garden is a family thing. Our garden is a relaxed thing – we’re not stressed about everything being perfect. We want it to be nice, but not at the expense of stressful relationships. Gardening should be a beautiful thing. I find that being among plants makes me feel extremely close to the Lord. His hand print is everywhere.
I think everyone should have the opportunity to garden; it does something for your soul. If you’ve taken the first steps, or have been gardening a long time, I commend you. If you want to garden, but are nervous about starting, let me encourage you. Get out there and try it! The world isn’t going to fall apart if you fail. And nothing is really a failure – you’re working with living things, and everything that happens to them will teach you a lesson.
So give it a try! But be warned…
…You may fall in love with it.
Which tip most resounds with you? Do any experienced gardeners out there want to second any of Amber’s suggestions?
~
Amber is the second oldest in a family with six children, and is serving the Lord at home through various ministries and entrepreneurial adventures. Besides gardening, she also enjoys writing, sewing, cooking, baking, music, and reading, and blogs about using skills for the Lord at www.fruit-of-her-hands.blogspot.com.
Other Related Posts You May Enjoy
- A Tale of Two Gardens part one
- How to Plan Your Garden part one and part two
- Organization in the Garden: Evaluating What You Have and What You Need
- Getting Organized in the Garden: Seed Starting and Planting Schedule
- Naturally Controlling Pests in the Organic Garden
- 5 Steps to Being a Lazy Gardener
- Gardening in Less-than-Ideal Spaces
- 7 Gardening Lessons from a Novice Gardener
- Selecting Seeds for Garden Success
- Gardening with Herbs 101: Where to Begin
- Gardening with Herbs 101: What To Grow
- How to Plant a Garden that Works for Where You Live
- 7 Reasons to Square Foot Garden
- Plan & Plant Now for Sustainability, Freedom, and a Backyard Revolution



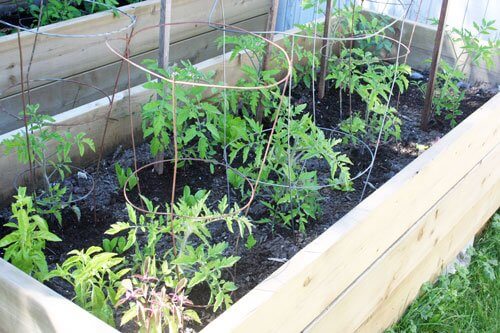
We grow an organic, raised bed garden. Tip #3 about cover crops has REALLY made a difference for us. In spring, once the seeds sprout, we take grass clippings and cover all the exposed dirt, several inches thick if we have enough clippings. Weeding is almost eliminated that way, the soil is enriched, and the garden looks pretty. In fall we cover the beds with several inches of leaves, then in spring the leaves that haven’t broken down we rake off into the paths, and then we are set to plant again with very little weeding. I can’t say enough what a tremendous time/work savings difference this has made for us!
Thank you for doing this today!!
I am still confused when it comes to cover crops. I am not sure what I am confused about though. I don’t think I could plant it under things like tomatoes- mine only get about 2-3 feet high, max, and there appears to be no space underneath really. I can’t think of anything that grows high enough around here to grow another thing under it! I thought cover crops were supposed to go on soil that you aren’t using for the year. Can someone direct me to some “cover crops for dummies” type of link or book? LOL Basically I need some simple info on how to feed my soil. Everything I have tried to find online or at the library seems so complicated. Any ideas where to find simple info?
About choosing plants- I agree its really important. SOOO hard to do when looking at seed catalogues. I am learning more and more that its crucial to put the majority of the garden effort into growing things suited to your climate. I was convinced before, but now I am even more convinced. Growing things that can be eaten fresh AND frozen or stored (ie. not tons of lettuce, LOL) are better since then they don’t all have to be eaten fresh.
Family involvement- this is a hard one for me, since my kids are 7 months and 3. The 3 year old is just starting to get into doing simple things. My husband, even though he is wonderful and helpful- is more than happy to do any digging, but then he says its all mine- he really doesn’t like gardening at all! I try to understand that.
Schedule time- this is what I have learned this year. I HAVE TO put “garden time” into my daily routine (aka “schedule”). Its SO true!!!
Thank you again for writing this post! It really is great to see how someone else built up a garden from clay. Did you have to add soil to it, like I did? If we didn’t we wouldn’t have a garden at all- we could sculpt our “soil” aka grey clay.
Nola;
We’ve never added a single bucket of soil to our garden – only compost-type ingredients, such as manure (LOTS of that!), leaves, grass clippings, composted kitchen scraps, etc. Yvonda mentioned some GREAT ways to use those kind of things in her comment.
We have friends who had a truckload of beautiful black soil brought in to make their garden. That’s a lot faster than building up the clay slowly, year by year. …But I can’t describe the satisfaction in knowing we “built” our own soil. We know what’s in it. 🙂 It’s worth trying, if you have the time, and it’s possible. It really CAN be done! If you have access to Lama or Alpaca manure, get as much of that in your soil as you can. It’s the best manure out there.
As far as resources go, I’m afraid I can’t think of any books that deal specifically with cover crops, though my Dad may know of some. I know that the gardening book with the most worn cover at our house is “High-Yield Gardening: How to Get More from Your Garden Space and More from Your Gardening Season”
By Marjorie B. Hunt, Brenda Bortz. If I remember correctly, there is some info on cover crops in there as well – you might want to check that one out. “Joy of Gardening” by Dick Raymond is one of my personal favorites because it’s so readable, with lots of photos. That one has lots of info on cover crops, too.
You’re right about cover crops being used in soil that you aren’t using – that’s one great way to build up soil. But they can also be used to keep weeds down in the way I described. We use clover, buckwheat, annual rye, peas, and beans as cover crops by themselves to build up the soil, but when we want something to go “under” another crop, clover is our first choice because it doesn’t get very high (it would probably fit under your tomato plants.) Something like zucchini or squash will do a nice job of covering the soil on its own, but things like tomatoes or anything on a trellis can benefit from the ground below them being covered. Another way to use clover is between rows of beets, carrots, etc. if you plant in rows instead of beds, or in rows within the beds. If you don’t grow any crops that can “fit” a cover crop under them, don’t stress! Just use other means to build up your soil when your crop isn’t in there. 🙂
And hang in there with your children – I didn’t “fall in love” with gardening until I was in my teens. :):):)
Oh, I’m so glad you posted the second post now, Stephanie! We are starting our first garden, and these steps were very helpful.
I live in northern Florida, which has a unique growing season, so I’ve been scouring the internet and local sources for information on our area’s growing patterns. I’m glad your first step was “start small”, Amber. I needed that realistic reminder 🙂
Yes, yes, yes! Start small and grow from there. But do consider working up to where your garden produces enough to share with another – especially the elderly who are no longer able to work a garden of their own. This takes time, but it is a worthy goal to be able to bless others.
Thanks for some great tips, Amber.
We are looking at starting a garden next year. what kind of soil do you recommend for an organic garden When do I start andhow do I make a raised bed? thanks agian! Your sight rocks!
jill funkhouser –
I hope you do start a garden next year – it’s so rewarding! It’s probably fine to start with the soil you already have, and just add to it. First, remove the vegetation from the area you want your bed to be (get rid of the grass and its roots). Then loosen the soil with a shovel or garden fork at least 10″-12″ down. Break it up well enough so that you can add things in. Here’s a list of things you can add:
~ Things that have already composted (kitchen scraps, etc.)
~ Grass clippings and chopped leaves, if you’re starting in the fall. (These won’t have time to break down before planting time if you’re starting in the spring).
~ Lots of manure!! (Cow and rabbit manure are good – alpaca and lama manure is best. Horse and chicken manure should be REALLY old before use. Dog or any other manure from meat-eaters is a no-no.)
~ Worm castings – these are GREAT if you can get them.
Heap your soil up at least 10″-12″ above ground level – higher is fine, too. You can leave the bed as-is, for a no-cost bed that you’ll have to “re-heap” every so often, or edge it with something to make it long lasting. You can use whatever is available to you: non-pressure-treated wood, rocks, bricks,…around here we can get cement block cheap, so we used those for most of our beds. Just dig a narrow trench to give them a firm place to sit, and stack them around the bed! Wood takes a little more time to put together, if you’re screwing or nailing it together.
Dear, dear. Now I’m blushing – I’m afraid I’ve nearly written another post with all my talking during the comment section. Hope you ladies don’t mind. I do love garden talk!
I came back to check the comments again- I certainly don’t mind reading more about gardening, Amber! LOL. I think I tend to write a lot in poor Stephanie’s comments too. 🙂 Thanks for answering my comment. I actually have the one book you mentioned, about High Yield Gardening, I got it at a yard sale! It is great! I will have to look up more in it about cover crops.