Whole Wheat Bread Recipe
Confession: I am not so skilled in the kitchen.
Conflict: I need to write a blog post about a real food kitchen for Keeper of the Home.
Solution: Write about hope. Hope for those of us who feel clueless and overwhelmed at the thought of making better choices for our families. Hope that no matter how unskilled in the kitchen we are, we can still make a difference simply by trying. Hope that one day, with a little practice and good mentors, we can all serve our families by providing them with nutritious and delicious real food. I want to share with you a few of my trials and successes as I took a baby step toward a real food kitchen by making wheat bread.
How Healthy Is Whole Wheat Bread?
I remember well my disappointment when I found “enriched wheat flour” listed as the first ingredient in my store bought wheat bread. My thoughts were that if wheat was so good for us, why did the bread maker need to enrich it? I started searching and discovered that they strip out all the good stuff first and then have to add some good stuff back into the flour. What? I looked closer the next time I went to the store in order to find some bread that said “whole wheat flour” first on the ingredient list. It was a bit pricey, but I rationalized that the purchase was for the health of my family.
Wouldn’t you know, my family didn’t care for it. Thus started my research again for good-for-you, tasty whole wheat bread.
What I found surprised me. I learned that wheat starts to oxidize as soon as the berry is ground into powder (flour). This oxidation process immediately begins to “ruin” the nutrients in the wheat flour making it less and less usable by the human body. One of the easiest ways to stop this process is to bake the flour immediately into bread. Many bread bakers do not follow this practice, so the bread has already lost many of its nutrients. So why exactly am I subjecting my family to something they like if it isn’t super nutritious for them?
Finding Fresh Milled Wheat Flour

After many hours of reading the research, I decided to begin milling my own wheat and baking it into bread for my family. I saved and scrimped until I could purchase a bread maker and a wheat mill. I know this option of owning your own machines (especially a wheat mill) can seem daunting because of the cost involved, so below I’ve included some ideas for getting your hands on affordable freshly milled wheat:
- Find other women in your area that are interested in baking whole wheat bread for their families and combine your funds to own “part” of a mill that you all can share. I was surprised at how many of my friends expressed a sincere interest in grinding their own wheat after I started talking about it with them.
- Some natural or health food stores have a mill in their store that you can use if you buy grain from them.
- Check out your local farmer’s market to see if the grain vendors have a mill for their customers to use.
- Watch ebay or your local Craig’s List for a used mill at a discounted price. (This option is last because in my experience, everyone falls in love with their mill and never considers parting with it!)
(Also, a bread machine is not a necessity, but I have found it to be an invaluable tool for my family’s bread baking.)
The recipe I use is a combination of several different recipes, trial and error.
Simple Whole Wheat Bread Recipe
Ingredients
Instructions
Combining the ingredients:
- Stir1 egg, 1/3 cup oil, 1/3 cup honey & 2 cups hot tap water into bread machine pan.
- Add 2 tsp. salt, 1 Tbsp lecithin & (optional) 2 tsp +/- gluten.
- Grind 1/4 cup flax seed in a coffee grinder & add to mixture. Stir well.
- Add 3 cups freshly milled wheat flour to top of mixture and make a "little well" in the middle of the flour with your finger. Put 3 1/2 tsp instant yeast into the "little well" then cover the yeast with another cup of flour.
Preparing the dough:
- Set your bread machine for the dough cycle & allow it to begin mixing your ingredients. (I make my bread machine do all the hard work of mixing the ingredients, however, this can also be done by hand or with a stand alone mixer.)
- Slowly add another 2 to 2 1/2 cups wheat flour to the dough. (Depending on the weather, you will need more or less flour every time you make your bread. The more humid the air, the more flour you will need.) Use a spatula to scrape the excess off the sides of the bread machine pan & close the lid to allow the dough to rise. (If you're not using a bread machine, be sure to put your dough in a bowl & cover it with a damp towel. Place the bowl somewhere still (no drafts) & warm. Let it rise until it doubles in size. The bread machine top with open slightly toward the end of the rise. There is no need for alarm if this happens.
- Just before the first rise is finished, clear off your counter top and wash and dry it well. (This is also a good time to remove any rings from your fingers & pull your hair back again.) Then put a bit of olive oil on the counter top and smooth it around. (I also get my bread pans ready at this time with a coat of olive oil.)
- Once the first rise is finished, run your hands across your oiled counter top to keep the dough from sticking to your fingers, then take the dough out of the machine and divide it into two equal sections. Using your hands, roll it around into a ball and then roll it out into a thick cylinder.
- Tuck both ends of the cylinder under and put the dough in the pan with the tucked side down(Below you can see the loaf on the right is tucked.)The next picture is a shot looking down on the dough once it is first placed into the bread pan. Note that you can see the bottom of the pan in places.
The 2nd rise:
- Next, you need to find another still (no drafts) area for the second rise. Some people choose to preheat their ovens to about 200°F, turn the oven off and then place the dough inside the oven. Some ovens have a special proofing option which is a wonderful blessing to any bread maker!
- The second rise takes a bit of practice to get the timing just right, but when the dough is done rising, it should be about double the size it was when you started. The pictures below show the dough after the second rise is complete. Compare the fullness of these pictures with the ones above to get a good idea of what to expect from this step. You want to be careful not to leave the dough rising for too long or it will fall. (Yes, this happened to me.) It seems to make the bread a bit tougher which is obviously undesirable.
Baking the dough:
- Finally, preheat your oven to 350°F and bake for 30 minutes. Let it cool for about 5 minutes in the pans then flip it out onto a cooling rack. Once cool (or not - I love warm bread), slice it as thick or thin as desired and enjoy!
Notes


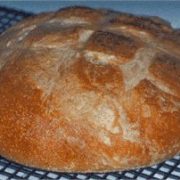
Here are a couple of close up shots of my “masterpiece”! It was a fun experience and my family now enjoys fresh whole wheat bread on a regular basis! It is a healthier choice for us and would never have happened without taking those initial baby steps.
What baby steps are you making in your own real food kitchen?


What kind of bread machine do you have?
I have a Nutri Mill wheat grinder, but haven’t made actual bread in several months now – I got tired of my husband eating SO much bread and making it by hand. So now we do some pancakes, tortillas, pizza crusts etc, NOT a whole loaf a day anymore.
.-= Andrea´s last blog ..RFKC Workspace! =-.
@Andrea, Andrea – I have a Sunbeam (model #5891). It was a birthday present, but I’m pretty sure my hubby got it at Wal-Mart on sale – it was definitely under $40. It has 12 different settings – one of which is the Dough setting. I don’t bake the bread in there because the recipe I use is too large, but the bread machine still handles the kneading of that large amount.
I have a WonderMill wheat grinder. Did I mention I love it? lol It was super expensive, but with as much as we use it, it was well worth it. I haven’t tried pancakes or tortillas, but I have used the recipe I wrote about to make rolls and pizza crust. I’ve also experimented with raisin bread, but I haven’t found just the right recipe yet. I would love to have your recipe for the pancakes & tortillas! Do you have a tortilla maker?
.-= Sherrie´s last blog ..Names of Jesus Garland =-.
If the dough overrises and falls, just knead it a little and let it rise again. No harm done and a little deeper flavor!
@Megan, Wow – thanks, Megan! I didn’t know that (obviously)! I’m so excited to have a solution now! 🙂
.-= Sherrie´s last blog ..Names of Jesus Garland =-.
That bread looks great!! 😀
We too like using lecithin and gluten in our whole wheat bread. 🙂 Another thing you can add is a little powdered/ground ginger (like what you probably have in your spice cupboard!) which makes the yeast happy. 😀
I just love homemade bread… 🙂
.-= Tammy L´s last blog ..Meal planning before baby arrives: Update on freezer meals and casseroles =-.
@Tammy L, that’s so great to know! Yeast is such an interesting thing to me. I don’t completely understand it, but I know we couldn’t get along very well without it now. Thank you for sharing your wisdom! 🙂
3 cheers for homemade bread!!
.-= Sherrie´s last blog ..Names of Jesus Garland =-.
This is awesome! I am just starting to think about all of this and came here to look up recipes and ideas. I had no idea that you could grind your own flour! I love to bake and I can’t wait to see if my local health store has one of these for customers to use. If they did, would I need to rush home and bake it right away?
.-= Angela @ Homegrown Mom´s last blog ..To Those of You Who’ve Asked =-.
@Angela @ Homegrown Mom, The faster you are able to bake once you’ve milled your wheat berries, the better. The oxidization process begins to break down the nutrients immediately once the hard shell of the berry has been broken (milled). If you absolutely can’t bake on milling day, the next best thing is to freeze your milled wheat. I wish you a speedy results as you begin this rewarding journey of blessing your family with fresh, homemade wheat bread!
You might want to check out Artisan Bread in 5 minutes a day from your library. They actually have quite a few recipes on the website too.
The bread making is incredibly quick and easy, and they have a lot of excellent whole wheat recipes. No worrying about timing the second rise, you don’t have to buy a breadmaker since there’s no kneading (just an initial mix).
I have no financial or any other interest in their product, just an interest in good homemade bread!
@Tom, Thank you for the tip, Tom! I would like to read the book you mentioned. I’m interested to see how it skips the kneading step. Happy bread making!
.-= Sherrie´s last blog ..Suburban Nature Strolls- After the walk =-.
There’s a wonderful company that I buy my wheat from, and have gotten my WonderMill and Zorjirushi Bread Machine from in Georgia. They’re the Bread Beckers and are WONDERFUL! Milling your own wheat and making your own bread has been their ministry/business for well over a decade. They sell everything, and have lots of yummy recipes on their website! It’s http://www.breadbeckers.com Enjoy! Thanks for the post!
Love bread Beckers! Order my wheat from them through a coop!!
Hi,
Love your article. I was wondering if you had a whole wheat bread recipe that I could use that didnt require me to use a bread machine.
Thanks,
Shalda
I’ve just recently gotten into whole wheat bread baking, and I’m excited about the health benefits of freshly ground flour. In my research, I have read that about 40% of the nutrients oxidize by the first 24 hours the wheat is milled. But I am curious and I haven’t found anything about what baking does to the nutrients. Do you know anything about that? If you bake the bread, do the nutrients continue to oxidize, meaning that you should really mill, bake, and EAT all the bread within one day of milling?
I am going to try this recipe using ground spelt that has been soaked in a quarter cup kefir and water mixture for 24 hours – I’m not that great at baking yet, and I love anything I can do in my bread machine. I tried the kefir soaked spelt in a pizza dough recipe today that got ten stars out of ten from my family…thanks for the recipe:)
Great informative post! I’ll be linking to you on my bread blog post Tuesday. I was just wondering what the lecithin does. Is it totally necessary? Also, is this bread good for sandwiches or is it a little crumbly?