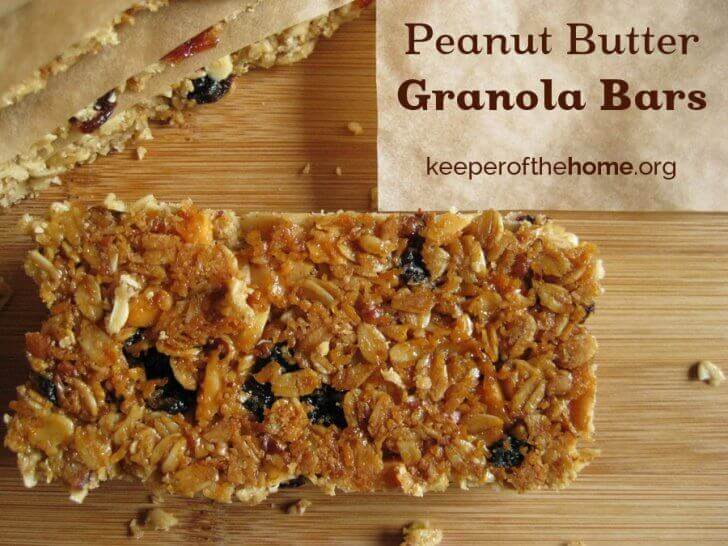
Perfect Peanut Butter Granola Bars
By Kresha Faber, Contributing Writer
I absolutely love granola bars. They’ve been a favorite snack since I was a kid.
Whether it’s a road trip, camping, hiking, a toddler snack in the diaper bag, or just to have something on hand for a mid-afternoon energy slump, granola bars always seem to fit the bill. They’re that lovely combination of protein from the nuts, quick sugar from the maple syrup and dried fruit, and long-lasting energy from the oats.
I also happen to love peanut butter, so lately I’ve been making these peanut bars whenever I get a chance. They’re based on the basic granola bar recipe found in my latest book, The DIY Pantry, with a simple peanut butter substitution.
I call them “Perfect” Granola Bars not because I desire to be arrogant in any way (there are lots of really fabulous granola bar recipes out there), but this one is “perfect” because it’s a very basic recipe that can be customized to nearly anyone’s favorite flavor and texture. I’ve made it dozens and dozens of times with varying ingredients and varying textures and I haven’t had a failed batch yet.
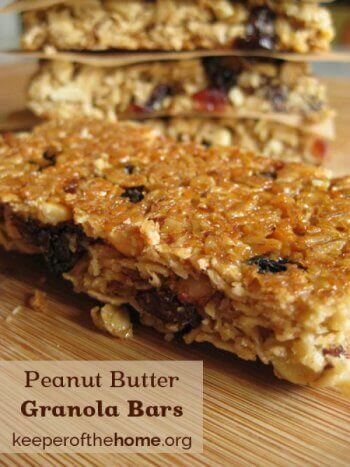
The beauty of this recipe lies in the basic science of sugar and how sugars harden as they cool. You can adjust the final texture just by adjusting how long you leave them in the oven.
If you like them soft and chewy, for example, take them out of the oven a bit early. If, like me, you like them a bit crunchy, then leave them in a few extra minutes until the edges are really starting to brown. Don’t skimp on letting them cool completely before you enjoy them, though, or they won’t set properly. (Ask me how I know – we usually down about half the batch before they’re cool and I’m left with a kitchen full of crumbs from a snack that hadn’t yet melded!)
And as for the sugars in the recipe, the sugars are all naturally-occurring and minimally-refined, such as maple syrup, honey, brown rice syrup, and evaporated cane crystals, so you’ve got the sweetness of the sugar with some of the natural minerals still intact. If your peanut butter is sweetened, you may want to cut back on the honey just slightly.
Oh, and a last note – I call for barley malt syrup in this recipe. I can find that easily at health food stores in my area, but I know for some, it’s a difficult to find item, so feel free to use any other minimally-refined liquid sugar in its place (e.g. maple syrup, honey, etc). I call for barley malt syrup because of the nutty flavor it gives that replicates store-bought brands. Personally, it reminds me of the nuttiness of Grape-Nuts. If you use other syrups, just know that other syrups will make the bars a bit sweeter, so cut back if desired. And of course, you can buy it online if you can’t find it in your area.
Enjoy – and may you have great joy wherever your journeys take you this summer!
Perfect Peanut Butter Granola Bars
Ingredients
- 4 cups rolled oats divided
- 4 cups add-ins sunflower seeds,flax meal, chopped nuts, flaked coconut, etc.
- 1/3 cup maple syrup or honey
- 1/3 cup barley malt syrup you may substitute more maple syrup or honey, if necessary
- 1/3 cup unrefined cane sugar
- 2 teaspoons sea salt
- 2 cups peanut butter preferably creamy (see how to make super creamy homemade peanut butter)
Instructions
- Preheat oven to 300ºF. Line a large baking sheet with parchment paper and set aside.
- In a large mixing bowl, pour in 3 cups of the oats. Add the other 1 cup of oats to a blender and pulse for about 60 seconds, until the oats have been pulverized into flour. Add the oat flour to the large mixing bowl. Mix in whichever nuts, seeds, or add-ins you desire.
- In a large, heavy-bottomed saucepan, heat the maple syrup, brown rice syrup, cane sugar, salt, and peanut butter over medium heat, just until the sugar is completely dissolved, 3 to 5 minutes.
- Pour the syrup mixture over the oat mixture and stir to coat completely.
- Using a well-oiled spatula, scrape the oat mixture onto the prepared parchment paper and press the oats down as compactly as possible, preferably until about 1/4" thick.
- Bake for 35 minutes, until a deep golden, or 25 to 30 minutes, if you like softer bars.
- Cool the mixture for about 10 minutes and then cut it into 24 bars without removing from the baking sheet. Let the bars sit for 1 hour. Once set, cut them again with a sharp knife and lift them off the pan.
- Store in an air-tight container for up to 2 weeks, or in the freezer for up to 6 months.


So… if this is possible…. the 1 cup of oats that you blend into oat flour — can you substitute that for coconut flour? The reason I ask is I am grain free (and sugar free) but am ok with natural sugars, I would use coconut palm sugar and raw honey, but if I do go with the oats, then I would like to go with fewer. I am grain free by choice. But honestly I am sick and tired of not having anything to eat so I am considering adding back oats (occasionally) and rice (occasionally). It sucks not being able to eat many things (I live in a 3rd world country where everything is served with beans and rice).
Hmmm… well, you could certainly try it – I think the texture would be right, but the granola bars may turn out a bit more crumbly. They’d still be fine, but they might not hold together quite as well (oat flour tends to be quite gloopy, so it works well as a glue in recipes). So, yes, I’d say go for it!
I hope that helps. 🙂
Oh, I also think I am going to try to substitute some of the coconut palm sugar (that I will be already substituting for the cane sugar) for Stevia powder. I want to just give it a try and see what they taste like.
I always carry homemade granola bars on the go. They taste so much better than the store bought kind. Thanks so much for the recipe!
You’re so welcome! I hope you enjoy them. 🙂
What can be subbed for the peanut butter? We have to be completely nut-free. And 2c. peanut butter is a LOT to sub with something else. I don’t know what would work.
Actually, any nut butter or seed butter should work just fine. As long as whatever you use melts and whisks in nicely with the sugar syrup so that the whole mixture is smooth and pourable, the recipe is very forgiving. You could even get away with reducing the amount if needed – the only effect will be making them a bit more crumbly, but it should still work!
Have fun and good luck!
Could these be left unbaked for even chewier bars?
Hmmm…. well, I will admit I always snitch a bit of the mix before I pour it in the pan, and while super-yummy, it pales in comparison to the flavor of the finished bars. They would be super-crumbly, as there’s not much to hold them together until the sugars harden a bit, and likely *too* sweet for more than a few bites because the sugar amounts in the recipe have been calculated for how they will harden and caramelize while baking and somehow, the raw mix always tastes sweeter to me than the final batch.
So, I guess I’m saying – there’s no reason you couldn’t, but it would be basically raw granola. Yummy, but not granola bars.
I hope that helps!
Can you believe that making granola bars has been something I have never done because it seems too daunting? The reason is because the recipes usually call for things I have never purchased. Can you tell me what other things could be added (you just say etc.)? I will be attempting these bars but I don’t think my family would like any of the ones you mentioned.
I am considering this recipe for a week-long 700km (450 mile) charity bike ride I’m doing this summer from Toronto, Ontario to Montreal, Quebec. http://bit.ly/1cxkaED
I have food intolerances so have to bring all my own food.
Can you tell me the nutritional info in terms of carbs, protein and fibre? I know it will vary depending on the “etc’s” one adds, but can you give a general number on the base recipe?
Thanks!
Do you think it would be possible to leave out that 1/3 cup of cane sugar? One whole cup of sugar just seems like a massive amount. You did say that the sugars help to bind the other ingredients together though, so I wonder.
Thanks!