Pennywise Platter Thursday: Simple, Affordable Bread

For all those who haven’t heard about it yet, today is the kick-off for the latest carnival from The Nourishing Gourmet, my favorite food blog. The goal of the Pennywise Platter Thursday carnival is to create a place where we can share how we serve and buy nourishing foods, but as frugally as possible!
I am so appreciative of a carnival with this focus, especially as our family is about to enter a season of a more limited budget. My food budget won’t be going down, but it certainly won’t be going up or having any extra wiggle room, which is challenging these days as prices have risen so much and my family continues to grow and eat more!
I’m sharing the bread recipe that I have been making for the past several months now, with much success. It’s not my own recipe (it comes from Serene of Above Rubies and was in the last issue of the magazine), but I thought I would pass it on and let you know how well it’s been working for me!
The four things I love about this recipe/method:
1) It is so simple! It takes me no more than 20-30 minutes to whip up the dough (that’s on days when I have to grind the flour) and sometimes as little as 15 minutes! Not bad, for a recipe that makes 3 loaves! Not to mention, it only has 4 ingredients, 1 of those being water!
2) It is nourishing! Since it is a soaked, sourdough recipe, it is very digestible, the phytic acid has been broken down and the nutrients are readily available to us.
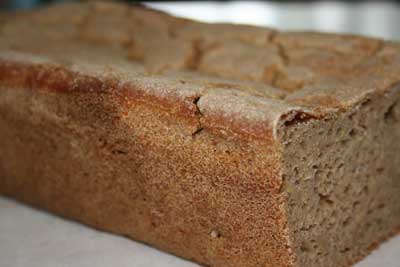
3) It is good! It may not be that beautiful, fluffy sandwich bread that you buy at the store, but the taste is so nice, and the texture is not too dense or crumbly (which can sometimes be a challenge when making whole grain or non-wheat breads, and also with sourdough breads). My husband has not liked all of my bread making attempts, but he enjoys this one quite a bit, as do the kids and I!
4) It is cheap! Ahem, frugal. 🙂 I make 3 loaves of bread, using only 6 1/2 cups of flour (I buy the grains in bulk, making it fairly cheap for organic, non-wheat flours), some salt, sourdough starter (more flour and water), and water. I just calculated the cost, and it adds up to $2.56 for the batch or about $0.86 cents per loaf (that’s based on my US co-op prices- in CAN $ it would be $2.95, or $0.99 cents a loaf).

Homemade Bread Recipe
Ingredients
- 3 1/2 cups kamut flour you can substitute spelt flour, as in the original recipe, or whole wheat flour
- 3 cups rye flour
- 1 quart sourdough starter
- 3 cups filtered water
- 1 1/2 TBSP salt
Instructions
- Mix all together, with a heavy duty wooden spoon or something similar, for 5 to 10 minutes. The mixture will be wet enough that there's no way you could knead it. Instead, you just stir it really, really well, and you will notice that the texture begins to change as the gluten strands lengthen, and it will get harder to stir. It really doesn't need any more than 5-10 minutes!I have actually recently been experimenting with mixing up the dough in my Sunbeam Mixmaster. I know that you're not supposed to use metal on sourdough, as it can weaken the culture. However, so far the recipe has still worked just fine the 2 times that I have tried it. It takes even more of the work out of it, and mixes it quite well.
- Pour the dough evenly into 3 well greased bread pans (I use my leftover butter wrappers to grease them). Using a wet hand, smooth or flatten it a bit.
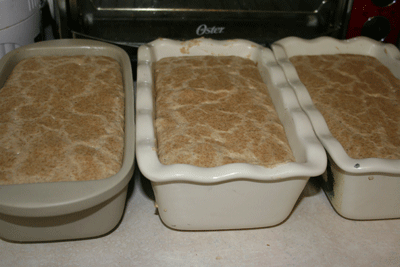
- Place the bread pans aside on a counter for at least 7 hours, covered loosely with a dish towel.
- Once they have risen sufficiently, basically double in size and close to the top of the bread pan, they are ready to be baked. For me, this usually happens after about 7-8 hours. If they have risen before the 7 hours, wait it out. They need the full amount of time for the phytic acid to be broken down through the fermentation process of the sourdough. I've also had times when perhaps my starter wasn't quite active enough, and I left them slightly longer. No big deal, but be forewarned that if you leave them significantly longer (like 14 hours, oops! 🙂 they will be very. very. sour. Still good, but sour.
- Bake at 350 F for 1 hour. (When you use kamut instead of spelt, it seems to increase the baking time a little. It's difficult to say whether it's just my oven or not, but I have found that it needs more like 70-75 minutes for me to have them turn out fully cooked in the middle. I haven't tried it with wheat yet, so no tips there.)
Notes
The Recipe:
(This is actually half of the original recipe, which is intended to make 6 loaves of bread. I only have 3 bread pans, so I cut it in half and it makes enough to last us about 2 weeks, give or take)
3 1/2 cups kamut flour (you can substitute spelt flour, as in the original recipe, or whole wheat flour)
3 cups rye flour
1 quart sourdough starter
3 cups filtered water
1 1/2 Tbsp salt
1. Mix all together, with a heavy duty wooden spoon or something similar, for 5 to 10 minutes. The mixture will be wet enough that there’s no way you could knead it. Instead, you just stir it really, really well, and you will notice that the texture begins to change as the gluten strands lengthen, and it will get harder to stir. It really doesn’t need any more than 5-10 minutes!
I have actually recently been experimenting with mixing up the dough in my Sunbeam Mixmaster. I know that you’re not supposed to use metal on sourdough, as it can weaken the culture. However, so far the recipe has still worked just fine the 2 times that I have tried it. It takes even more of the work out of it, and mixes it quite well.
2. Pour the dough evenly into 3 well greased bread pans (I use my leftover butter wrappers to grease them). Using a wet hand, smooth or flatten it a bit.
3. Place the bread pans aside on a counter for at least 7 hours, covered loosely with a dish towel.
4. Once they have risen sufficiently, basically double in size and close to the top of the bread pan, they are ready to be baked. For me, this usually happens after about 7-8 hours. If they have risen before the 7 hours, wait it out. They need the full amount of time for the phytic acid to be broken down through the fermentation process of the sourdough. I’ve also had times when perhaps my starter wasn’t quite active enough, and I left them slightly longer. No big deal, but be forewarned that if you leave them significantly longer (like 14 hours, oops! 🙂 they will be very. very. sour. Still good, but sour.
5. Bake at 350 F for 1 hour.
(When you use kamut instead of spelt, it seems to increase the baking time a little. It’s difficult to say whether it’s just my oven or not, but I have found that it needs more like 70-75 minutes for me to have them turn out fully cooked in the middle. I haven’t tried it with wheat yet, so no tips there.)
That’s it! About 20 minutes of work, 7 hours of doing anything else that you feel like doing, and 1 hour of baking. I like to have mine on the counter, starting to rise by 9 or 10 am. This ensures that I can have the loaves in the oven by 4 or 5 pm, while I’m cooking dinner.
To see the original recipe in video format or to troubleshoot your own baking, click here.
Do you make your own bread? What type of bread do you make, and do you find it to be cost effective and worth the time?


This is a fantastic demo! I am always looking for ways to show my customers how to make use of some of the more unique grains out there, such as kamut and spelt, and I will have to point them to this tutorial.
I am glad to hear your kids and husband like it! How would you describe the taste?
We love sour dough bread, but have only had the while flour version, so I have been eyeing this recipe on your blog for a while now – I am nervous to try it as my attempts in making bread has not been very sucessful in the past.
I make quick breads (with baking powder) or grain bread dough in my bread maker, which I then form into buns, but I think I am going to give your recipe a try.
By the way, I had to giggle that 3 loaves of bread lasts about 2 weeks for your family – that will change as your kids grow – we go through 5 – 8 loaves a week, depending on whether everyone took sandwhiches for lunch! Obviously, I am always on the lookout on ways to save money on food!!
I HAVE to try this recipe. Thanks for being part of the carnival! I always love your posts (and I’m honored that I am your favorite food blog. :- ) )
How do you make the sourdough starter?
I would like to try your bread recipe sometime but first I would need to make the sourdough starter.
I do bake bread for my husband and I. I use organic products at this time and eventually when the budget allows I would like to buy the grains and mill it myself.
Have you compared this to Kimi’s @ Nourishing Gourmet sourdough recipe on her blog recipe index? that is the one we always make and love it.
Jessica
I love sourdough and need to figure out how I can use it for my gluten free kids. What do you think I can use instead of the rye? I’m nervous to try it with using only Kamut….
Thanks for sharing – I LOVE your recipes!
Sounds great, I will have to try this during the summer.
So far I have finally found a recipe that works for us for wheat bread (but I can’t eat it) that is frugal and that I can actually make, and that my family likes. So its improving…my bread making skills I mean. 🙂
I saw this in Above Rubies and frankly, I thought, “hmm…that looks too hard!” But the way you’ve explained it looks simple! Thank you! I am a newbie to your blog… and I’m really enjoying it! 🙂
Blessings!
Gotta love Above Rubies! *smiles*
This does look very easy and simple. I’ll have to try some when I get home to the states.
I’ve been making this bread for a few months now. So easy and we love it!
A few people have asked about how I make my sourdough starter. I’ve previously made my own, but this time I actually bought mine from Cultures for Health:
http://www.culturesforhealth.com/zen/index.php
Mine is the New England starter, and I really enjoy it.
It’s not hard to make your own, though. Here is a great tutorial:
http://heavenlyhomemakers.com/blog/category/sourdough-starter
(You have to scroll all the way down to the bottom of the page and work your way back up)
I’ve done this type of method before, and it really does work and isn’t hard to do!
hi
How can I make a simple white bread ?More exactly ..How to prepare the simplest bread?
Frank
1 quart sourdough starter sounds a lot. a lot of people, like me, usually keep like 10-100g starter, which will take a while to reach 1 quart (4 cups, am i converting it correctly?). BUT i am really keen to try this recipe coz they do look beautiful..:D. whats the hydration of your sourdough?
i know this is an older post, but i have a question. i just made this recipe and WOW was it salty (or at least for me). i haven’t fed it to my husband yet, but i can already guarantee that this will not go over, so i’ve decided to hide it an avoid rejection for now :p what is the function of the salt in this? is it just flavor? or does it do something else? can i reduce the amount without compromising the bread? thanks for any info! i really really want this recipe to work! 🙂
@Jenny, I think you could absolutely cut down the salt in the recipe. It’s really just a flavor thing. I wonder if it also depends on what type of salt you use? I use celtic sea salt, and I don’t think the taste is quite as strong as, say, white table salt. But I don’t think decreasing the salt will hurt the way that the recipe works.
Oh my gosh!!! I had the flu last week and while laying in bed miserable with 102 degree fever, I was poking around all my favorite real food blogs and I found this bread recipe. I loved how simple and frugal it was so I had to try it. When I realized that it only took me 20 minutes and I had three pans of bread rising on the counter, I said a little prayer: “Let this be the one.” It is THE ONE!!!!! It is the best sour dough I have ever made AND I can totally see myself making this weekly or so because it is so fast. Now I don’t have to be so stingy with the bread not knowing when I might find time to make some more. I have been so overwhelmed since converting my family to a Weston Price kind of diet in August. This recipe made having the flu completely worth it!!! Thank you so much!!!!!
@Kari, You’re welcome, I’m glad you liked it to much!
To add some of my own “wisdom” on sourdough bread making~ I have used my bosch with a metal dough hook & at times left it overnight in the same bowl with hook attached & never had any trouble with the rise of dough, however, I have discovered the dough left in the mixer is eating away the bowl! It is a plastic bowl. So, now I transfer to a ceramic bowl after I mix the dough for its overnight rest.
I make anything bread I can think of using this sourdough starter, biscuits, challah(our favorite) flat bread, pizza dough etc.
Here is my recipe for the challah
1 cup sourdough starter
1 cup water (non chemical~no chlorine etc, it reacts w/sourdough)
1 tsp real salt
2 farm fresh eggs
1 cup or to taste of honey or molasses
enough flour to make a soft not wet dough
Mix thoroughly but do not over mix.
Flour your flat cookie sheet liberally
Place dough on floured cookie sheet, shaping by twisting or braiding.
Cover with a towel & leave overnight.
Place in a cold oven & set oven temperature to 350. Bake till hollow sound
when tapped. Enjoy~
I have a sourdough starter that I’ve been feeding for a while and I never know how it’s doing. Sometimes I can’t get to it fast enough (like when we went on vacation and didn’t feed it for a week), so I wonder if I have killed off some of the living organisms in it. If there are less organisms in the jar then adding the usual amount of “food” (sugar, water and potato flakes) seems like it would be more than the starter could “eat”. Sometimes the bread turns out overly sweet and I wondered if that was what happened.
Have you come across any websites that teach you how to assess your sourdough starter to get a good read for how it’s doing/how to adapt to its food needs?
Leaving it for a while can definitely weaken your starter. At that point, it’s best to feed it in small amounts and watch for signs of “life”, and if it looks promising, then every 12-24 hours keep feeding it a little bit more until you gradually build it back up and have it really active and bubbly once again. Although, it sounds like we do our starter differently. Mine is purely water and flour, no sugar or potato flakes necessary.
This sourdough ebook is the best resource that I have found (their sourdough eCourse is also fantastic- so many recipes, so much information and tips, I’ve found it really helpful):
http://gnowfglins.com/ecourse/240-45-3-49.html
I am feeding my starter and preparing to make this recipe. Do I need to soak my kamut and rye flour overnight too? Or does the rising of the dough break down the phytates enough already? Also, should I use all-purpose flour or wheat when feeding my starter for this recipe? Thanks and can’t wait to make this bread this week!