What Bone Broth Should Really Look Like

The topic of homemade bone broth has come up many times on this blog. You just might know by now that I think it is fantastically nourishing for the body, as well as the perfect way to help stretch out the budget and make good use of all that we’ve been given.
One common question that comes up when the topic of bone broth arises is:
“Is it supposed to get thick and gelatinous? If so, how do I get it that way? Mine never seems to thicken up.”
When I first began making bone broths, I couldn’t seem to get them to the texture that I wanted them either. The books told me that to know that I was getting the benefits of the gelatin in the bones, I should end up with a broth that is actually thick and jelly like when cooled. I knew that something was missing in the way that I was making my broth.
As I read more, I realized that the addition of apple cider vinegar in the beginning was very important, so I began to do that, but was still only occasionally achieving a gelatinous texture. In fact, the only times when it worked really well was when I used my crockpot to cook a whole chicken, with some water in there to start off the broth. Once my chicken was cooked, there would be small amounts of gelatin in the crockpot as well, which I would save to add once I began making broth with the remaining bones.
I then read somewhere that the bones should soak in cold water for about an hour before beginning to boil them. I put two and two together. When I make a chicken in the crockpot, it takes a while for the water to heat up. Thus, the bones were being soaked in cool water first, before being boiled. Aha!
The next time I made broth, I added apple cider vinegar to my pot with the bones, covered the bones with cold water, and let it sit for 1 hour. Then, and only then, did I turn the burner on and begin the process of simmering the bones to make the broth. For the first time, I suddenly achieved broth that cooled to the perfect, gelatinous texture, proving to me that I had indeed reaped all of the benefits (gelatin, minerals, etc.) from those bones. Success!
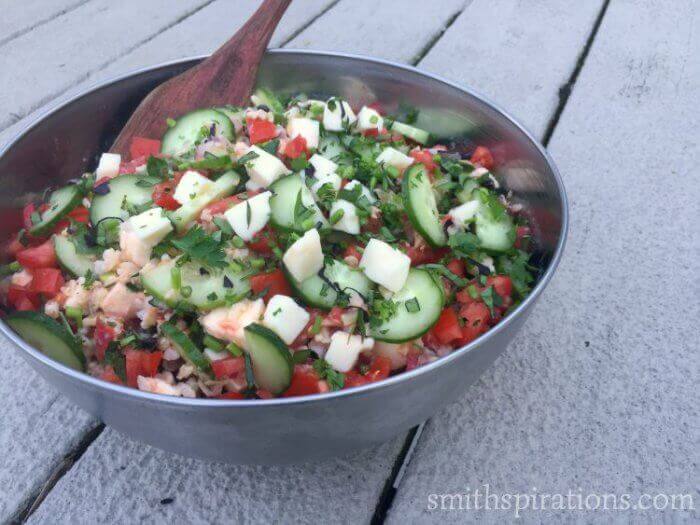
I took these pictures when I made a huge batch of beef broth some months ago, because the gelatin was just so thick that I hoped that you would be able to see it in the pictures. This is when the broth is completely cool, after being in the fridge overnight before putting it into jars to freeze. When it was warm, it was completely liquid and runny, which it should be (because who wants to eat jelly-like soup?), but once it cooled I could tell that it had turned out just right.

So that, my friends, is what bone broth should really look like. Any questions? Or tips from those who also make it?


Yup! The cold water soak is definitely the key for me as well!! Reading that put me in the mood for some nice warm chicken noodle soup, mmmmm.
Aha! Now it all makes sense…
I never knew what my jelly-broth was; i was worried it was all fat or something. I’m so relieved to know I’m doing it right. I usually cook my chicken in a crockpot and then save all the leavings. Then it usually stores in the fridge for a couple days before I get around to making it into broth, which I do by just boiling the heck out of it for a couple hours. Glad to know I inadvertently got the correct result!
@Sarah S. Chicken, Actually, you should never boil a stock. It was one of the first things we learned in culinary school. There are actually very few things you should boil. You should never boil eggs either. You can bring them up to a quick boil, but then you should automatically turn off the heat and put on a lid. Simmering is our friend, boiling is not.
Wow actually, should you? You sound so smart! I bet culinary school was actually illuminating! I bet I should go.
Thank you so much for sharing this! I have had the same problems as well. I’m looking forward to trying again. Hopefully I’ll have your same success!
This was definitely helpful. Wish NT cookbook had pictures like this. I’m so visual!
I was so pleased the first time I got my broth to gel. Now I can get a beef broth that gels thicker than Jell-o when it’s cold.
@Jenny, Fish bones have the most gelatin out of any bones. It really is fish jello once cooled.
I always thought it had to do with how much water I was adding. :-)Most of the time, mine gels up really nicely. Thanks for these tips. Now that I know that the “gelling” is good and necessary, I’m going to follow your tips to see if I can get it to gel every time.
How much cider vinegar to you add? I have some beef bones I plan to make broth with.
As for chicken, I almost always never make the broth the same night I’ve made the roast – same goes for turkey. In fact, I often just throw the bones in the pot (without water), put them in the fridge and start the process the next day. The broth always seems to gel. Perhaps it is the cold more than the water that does the trick? Anyways, now I know why it gels in the first place and am pleased to know it is good for us too!
@Melanie, Roast your beef bones in the oven before you simmer them on the stove. If you roast them in the oven with your onions (50%) carrots (25%) and celery (25%) you’ll get a beautiful flavor. Put the bones into your pot (if you have a roasting pan that can go to your stove top) or just to the side on a platter and cook together your roasted vegetables and some tomato paste. Put the bones and the vegetable mixture into the stockpot and simmer from there.
I also make broth like you do (thanks to you!) and I actually wondered what was up with why it was so thick and gelatinous. LOL. I used to always do it without soaking it for one hour first, and it still got thick, but last time, since reading that on your blog (I figured I had just missed that step) I soaked it and it was even more thick!
My husband and I prefer the bone broth to the broth I used to make that I didn’t use apple cider vinegar, soak it, or cook as long (and it wasn’t thick). I love that its more nutritous too!
My husband is Korean and bone broth is a popular dish. My mother-in-law taught me to make it. She soaks the bones for a couple hours in water, but she always told me it was to get bad blood out 🙂 Now I know why it is so important. We normally eat the bone soup with salt & chopped green onion & white rice. So yummy! Here is a link I found:http://newyork.seriouseats.com/2009/06/seolleongtang-ox-bone-broth-from-gahm-mi-oak-koreatown-nyc.html Also Kimchi is wonderful (spicy fermented cabbage & radish with ground onion, garlic, fish sauce and red pepper. Can’t get more nutritious than that!
I noticed you were putting your broth into a canning jar. Do you process it in a water bath or a pressure canner. What size portions to you freeze your broth in? Thanks for teaching me!
Thanks so much Stephanie! I haven’t been able to get my chicken broth to gel yet, despite the addition of vinegar so I think the soaking in cold water is just what I need.
Melanie, I usually add a few tablespoons of apple cider vinegar. I don’t measure, I just pour. 🙂 But that’s about how much I use for one large stock pot worth of bones. Here is the link to the post I wrote with instructions for making broth:
https://keeperofthehome.org/2008/01/homemade-soup-b.html
Kelly, I do put my broth into jars, but not to can them. I just like using my canning jars because they are thick and strong. I just pour the broth in, put on a lid, and stick them in the freezer. It’s just important to make sure that you leave at least an inch headroom, only put them in the freezer once they are completely cool, and let them thaw slowly on the counter or in the fridge, to avoid having the jars crack.
In regards to the size I freeze broth in, I like to do a mix of 1 quart and 1/2 quart (pint) jars, so that I have a variety to choose from depending on what I am doing. It’s also nice to fill an ice cube tray or two, and then pop the broth cubes into a ziploc bag to store in the freezer for those times when you just need a 1/2 cup or 1 cup of broth in a recipe.
Thanks for the tips! I’ve made bone broth a couple of times (the last time in my crockpot) but I haven’t been able to achieve the gel-like consistency. Next time, I’m going to try more ACV with a longer soak for the bones.
I have unknowingly been making bone broth correctly I guess! Mine has always come out with a gel like consistancy. I always thought I had done something wrong, even though it liquifies again as it is heated. I’ve never presoaked the bones first though. I’ll try that next time and see if it gets even more gelled.
Thanks!
How long do you cook your broth? I read your how-to post, but I have been going around with a reader on my site about this very subject. She said she read somewhere that cooking so long (24 hours like I do) breaks down the gelatin, but you’re saying just the opposite. Hmmmm. I usually only do the cold water soak 1/2 hour, so maybe I’ll try that differently. Just yesterday I tried cooking the stock only 8 or 9 hours, but still no gel.
@Katie @ Kitchen Stewardship, In culinary school we’d roast the beef bones before making stock. You can also do the same with chicken bones if you want a stronger flavor. Then we’d simmer the stocks all day and all night. We’d fetch them the next morning from the stovetops and strain them. We would either use them then (after degreasing or clarifying) or chill them and defat them the next day (easy to do when cold). At home I just leave the fat in.
My broth turns out gelatinous every time. I add the left over carcass of one baked chicken (rosemary, thyme, pepper, garlic, sea salt) with one bunch of celery, one medium to large yellow onion, a handful of peppercorns, and one bunch of carrots. I simmer gently as long as my schedule will allow on day 1. After cooling on the stove, I chill it overnight. Bones and all. I simmer as long as possible on day 2. Before going to bed I strain the cooled broth ( let it cool on the stove). Et voila’! I really hope this helps.
Thanks for sharing this! For years I have made homemade soups from the bones of our meat and the stock always turns to jello, but I have never understood why.
The first time I made chicken stock, when I took it out of the fridge- and found Chicken Jello- I panicked. I thought I had done something wrong and right away called my Mom. She told me it was fine and normal but she didn’t know “why”.
Now we know why (and that it’s more nourishing, too!), so Thank You!
Thank you so much. I couldn’t figure out what on earth I was doing wrong. I’ll be sure to try it this way next time.
For years I have been trying to get my broth to gel. Then I came across this article and felt I had finally found the missing link. So the other night I gave it one more try in my crockpot: one large chicken back (a 1-pound bone with plenty of meat and skin still on it), some chopped carrot, onion, and celery, and a few tablespoons of apple cider vinegar, all pre-soaked for one hour in pure ICE water.
I cooked it on low for 20 hours. Result: brown chicken water. Absolutely no difference from all my other attempts. How demoralizing.
I am now convinced that the laws of physics do not work in my kitchen. Can someone please tell me what they did — EXACTLY what they did — to achieve the miracle of gelatin in their bone broth? I’m even willing to pay for the secret. Just tell me!
@Jeff, I read recently (sorry, can’t remember where) that grocery-store chickens sometimes will not gel. I haven’t yet forked over the big bucks for a pastured chicken, but my first attempt at good broth didn’t gel either, so I’m thinking next time I’ll try starting with a pastured chicken.
@Jeff, Don’t cook your stock on too low of a heat. You want it to be where it just barely bubbles at a very slow rate.
Hi there, I’ve never not had mine gel and I do nothing special. Sometimes I boil the bones the same day I cooked the meat and sometimes I don’t. No vinegar, no soaking, no need to quick cool either. I wonder if your problem is with cooking it in the crock pot. I have never tried making it in a crock pot. I simply put the bones, skin and all other unusable bits and pieces into a pot with an onion (halved or whole), celery, carrot, bay leaf and peppercorns. Cover with water, bring it to a boil, reduce heat to simmer and I leave it to simmer for several hours checking it periodically to ensure the bones continue to be covered with water. I let it cool in the pot on the stove for awhile and when it is cool enough to handle then I strain all the water through a sieve. I put the liquid into a container in the fridge and once it’s cooled to it’s gelatin, I scrape the fat layer off the top and throw it away.
This is exactly what I do! After years of never GETTING it I finally tried it this way keeping all the flavors of the chicken itself and adding water cooked with carrots and potatoes in it as well as some seasonings and I get what I call “LIQUID GOLD” Its amazing how I get ready to roast a chicken in the crock pot and even though so tender and juicy ALL I can think about is my “LIQUID GOLD!
Jeff, I wonder if you could possibly be using too much water for one pound of chicken?
You will not believe what I did prior to reading this article.
I took my thanksgiving bird carcass, didnt boil but simmered it for 3-4 hours, refrigerated it and looked at it this morning.
Never having made stock before, I was horrified when I saw it was all clear and congealed. I thought it was all fat. I began skimming off INCHES thinking I would eventually get to the broth and figured out it was all clear gelatin. I almost threw it all out. I still have some left, but now i know I made really good stock by accident and wont throw it away next time!
Not for nothing, I didnt add anything to the meat and bones except 1 stalk of celery. It congealed clear and perfect.
Jeff…i am with you. I have been making broth for 30+ years and there is no consistency to the results. I am terribly OCD, so you’d think i would have it figured out by now. In the early years, it ALWAYS gelled, no matter what i did, vinegar or not. I have always cooked mine 24-72 hours, with more or less water, and have only used pastured bones for the last 4 years. And i never soaked it in cold water first, but it used to work. So, there go everyone’s theories. You would think a scientist would show up on one of these blogs. 🙂
I really don’t think about it. After you eat a roast chicken, put the carcass in a pot and cover with water. Maybe I do this right away or maybe I take the carcass from the fridge in the next day or two. Add salt & pepper. Maybe some bouillon, but maybe not, later if I were going to make Chicken and Dumplings or Chicken soup I’d put some bouillon in so it would taste chickenier. Bring to roiling boil for 15 or 20 minutes, then reduce heat and let it simmer for 45 minutes, no exact time, you could let it go for a few hours if you topped with water at midpoint, let cool enough so you can handle it,then remove the carcass and strain into a plastic container. Put on the top, in a few days or a week you open it and the fat will have solidified, you can pop that off like a lid & discard, what’s left should be completely jelled. Broth colored jello.
Sometimes I freeze it instead of jelling it, the jelling is for when I don’t have time for the freezing process, and sometimes I remove the fat and put the container in the freezer before it’s been in the fridge too long. Sometimes I put chunks of (cooked) chicken in it so when I use it all I have to do is toss in some veggies and some seasoning to make chicken soup or add dumplings.
Ideally I get to eat roast chicken, chicken and dumplings, freeze 1 quart bags of chicken soup broth, and one quart of clear broth. Great for cooking vegetables in.
I just get whatever chicken is on sale. Y’all’s may not be jelling because you’re using too much water. Just keep the carcass covered so the nutrients can get leeched from the bones, that means add some water if the stock gets reduced below the top of the carcass. A whole chicken fits snugly in the 3 quart pot I use.
Vinegar? NO! lol
Good luck!
Hopefully this works. I’ve tried so many times and it always comes out bland and thin.
Hi
The one thing you need for your broth to be gelatinous are not vinegar, which is for softening the bones to leach minerals, but to cool the broth fast after removing it from the stove. I experienced this problem myself sometimes when I started making bone broth, and found the solution to be the cooling after the removal from heat. You can use vinegar or not and see for yourself; if you cool the broth fast it will gel, if you don’t it wil not. If you read the bone broth info in the book (Nourishing Traditions) you mention in your posts you’ll see it says you must cool the broth fast. And, according to the article Broth is beautiful by Sally Fallon – “When broth is cooled, it congeals due to the presence of gelatin.”
As a side-note to those who cook bone broths, you can let the bones/water/vinegar mix stand overnight with no problems, only added minerals. You don’t have to let it stand only a hour or so as the recipes say.
Also, I used to skim what (scum) floated on top of the broth for years since reading it could ruin the taste or flavor. But some day I just stopped doing that, I have no clue why (a hunch), but my broths never tasted any better. Since then, for at least 16 years, I have never skimmed my broth. My point is that the practice of skimming may be of no use and therefore a waste of time, at least for those who does not include a lot of vegetables in the broth, which also shorten its shelf life.
Have fun 🙂
If your broth isn’t jelling, it is probably because you don’t have any cartilagenous joints in there. Add some roasted chicken feet to your broth, and your broth will be thicker than can be!
Hey there. My daughter taught me how to make bone broth, and like many comments mention, she said to add vinegar. I try to cook mine as long as possible. Take it off at night, and if cool it goes in frig. The vinegar helps preserve the broth also. So sometimes I’ll put it on the stove on low for several hours the second day. I let it cool and put in frig. Next day the fat should be solid at top along with residues (foam) and I break in pieces with spoon and skim off. And if it works you have nice jelled broth to save in jars to season as you like. Reminder… I found out the hard way. Never taste your food with spoon and put back in without rinsing. The enzymes/saliva is very powerful stuff and it breaks food down keeping things from jelling and thickening.
I have also found adding chicken feet adds to the gelatin in the broth, even when not letting it soak in cold water with apple cider vinegar. However, I did not know it was because of “cartilagenous joints”.
Good read, funny thing is that my wife is Filipino and they commonly create bone broth with beef. I did not pay attention to the thick liquid left after some of their dishes, but I can attest that they do it right. = )
Instead of the cold water soak I roast the bones in the oven for one hour at 360 F. Works well.
Thank you for this – this is the first time i’ve attempted to make bone broth and when i took the bones out of the crockpot, there was alot of gelatinous substance on some of them and i thought ‘surely, this isn’t right’. so i put the broth in the fridge, hoping for the best. i just skimmed the fat off of it and it looks like cloudy gelatin – thinking that i surely had bad broth, i googled what it should look like when it’s cold and immediately came to your blog. – Thank you! I guess i lucked out the first time making it. I had read to put apple cider vinegar in the water so i had done that and using the crockpot did the rest. Beginner’s Luck! and thank you for letting me know that i had done it correctly.
I made beef broth for drinking to heal a leaky gut as per Dr and must have got lucky as I cooled it down and then popped in the fridge and this morning I skimmed off the thick layer of fat and it was thick brown gelatin. What I want to know is, I have to have three glasses per day, so can I freeze the gelatin in jars and how much is needed per cup to add with hot water, to make a cup for the benefits. Most concentrated jars say a teaspoon per cup but I tried that and it tasted too thin. I put a tablespoon and salt and it was lovely. I read somewhere you should simmer slowly on the stove top, surely you can just add hot water to the gelatin once thawed from freezer, I have no idea.
Hi. Came across your article after I made beef bone broth from frozen bones in my crock pot. After ~20 hours, the liquid is completely clear. No colour to the liquid at all. I added Himalayan salt, ACV and bay leaves and purified water. I’ve never had this happen before. Any ideas?
I think the amount of water added may have something to do with it gelling up too.
Last night, I roasted some beef bones for the marrow. It goes well on toast with a good cab…LOL
Anyway, afterward I added the roasted bones to my ninja foodi with a few small pieces of onion and some salt/pepper…didn’t add any apple cider vinegar though….I added just enough water to cover the bones. Then pressure cooked on HI for a couple of hours. Removed the bones and put the bone broth into the fridge overnight. This morning, I scraped off the top layer of fat and the remaining entire bowl was complete jello. Transferred it all to some jars and put in the freezer for later use.