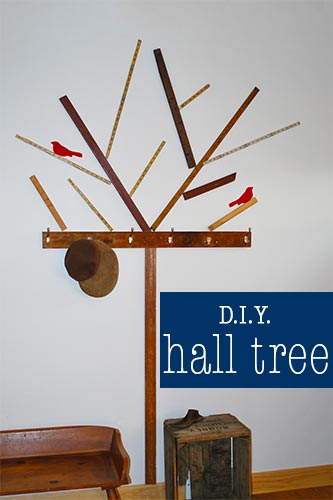
DIY Hall Tree
Written by Stacy Myers, Contributing Writer
When we bought our new home, it didn’t come with a coat closet. Bummer. We did have the Jesus closet, but alas, He’s gone somewhere else (thank you, yard sale!). But a girl just has to have somewhere to hang her coat and purse.
Laying a purse on the floor is just begging a toddler to reach in and play with your dental floss…or make “notes” on your checks.
Being a HUGE advocate of all things Pinterest, I set off to find myself a good idea for a hall tree. I found lots of ideas…but most of them required a good deal of work or money – neither of which we had much of after buying a fixer-upper with cash.
Then I found THIS rockin’ idea from Apartment Therapy! Since our home is decorated in an antique motif, I knew this would fit right in. There was only one problem: the instructions. Here they are: nail the wood into the wall; add hooks. The end.
I’m not sure about you gals, but I need more detailed instructions…that’s how I roll.
Since we already had some old wood and some hooks, this project was FREE! Can I get a woot, woot?!
So, here are the instructions for a DIY Hall Tree, straight from the mouth of The Queen of Crooked – and who cares if this tree is crooked? Tell visitors there was a big wind.
1. First, gather your pieces of wood.
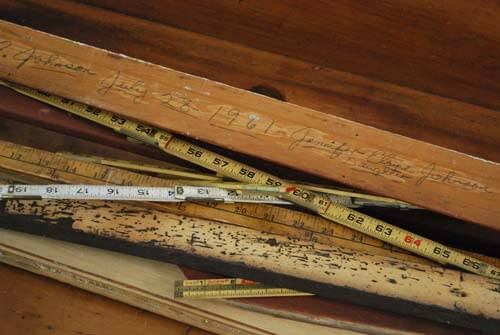
I have a thing for old rulers, so I picked some of those out of my stash. The other pieces of wood were found around this house and a few I pilfered from my mama. I wanted every piece to have a story.
You could use pieces of wood from around your place…or you could make the entire project with rulers! That would rock! You may have to cut some of the pieces to size. For this, I got help from my husband…because Stacy and power tools do not mix. Amen.
You’ll notice writing on one of the pieces. We found it when we were tearing out the old trim – on it is written the names of the people who built and bought the house. 🙂 Cool, huh?
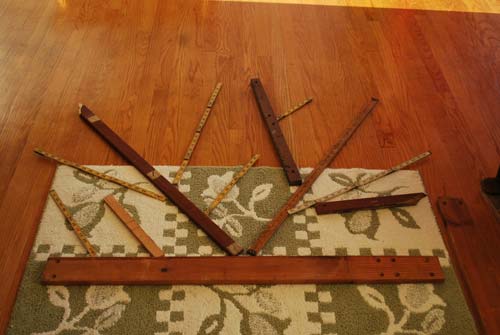
2. Now it’s time to lay out the design.
Use your floor…do not just go hammering willy-nilly on your wall. This puppy is PERMANENT. When you have it how you like it, you can begin to put it up. Did I mention this was PERMANENT? Make sure you like it before you nail it up. Otherwise your husband will fuss because he hates patching drywall.

Make sure you have help from your toddler. She can tell you when it’s crooked. She can also rearrange the pieces when you’re not looking…so much for prearranging.
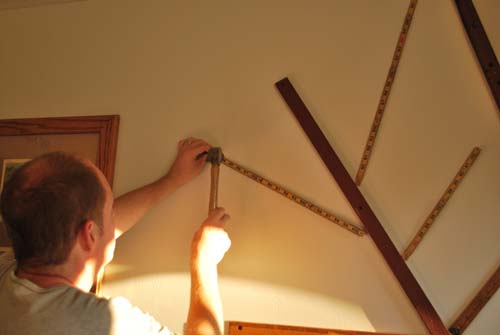
3. If you’re afraid of hammering your fingers to smithereens, then ask your husband to do this part.
We just used little finishing nails and hammered right into the drywall. If you’re going to hang hooks all over the tree, you’ll have to aim to hit studs. We were only going to hang hooks on the main part of the tree, so we didn’t worry too much with studs for the branches.
Be careful when nailing into folding rulers. There are metals pieces in there and it’s hard to nail through those. Or so I’ve heard from OTHER PEOPLE. *Cough*
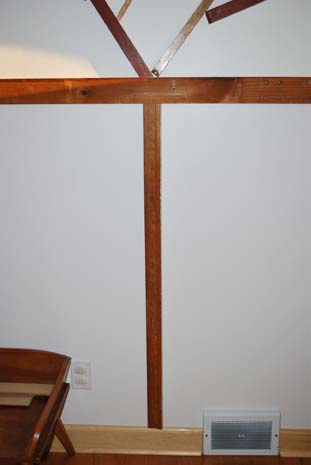
I used the wood trim with names for the base of our tree, and a piece of wood from my grandfather’s house for the main limb for hooks. As you can see, the baseboard kept us from having the tree to the floor – so you might have to work with that, too.
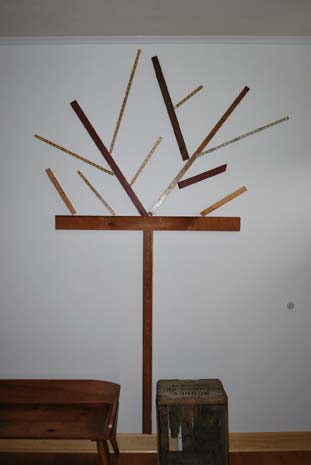
Ta da!!! There you have it…but something is missing. It’s not a tree without birds. It looks naked.
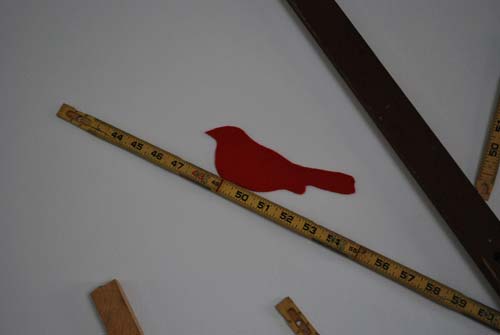
I found a bird pattern on Google Images that I liked. I printed it out and cut some birds out of red felt. I glued them on the tree with super glue. That’s some fun stuff right there – makes your fingers stick together.
Then Barry screwed in the hooks we had chosen and we were all set!
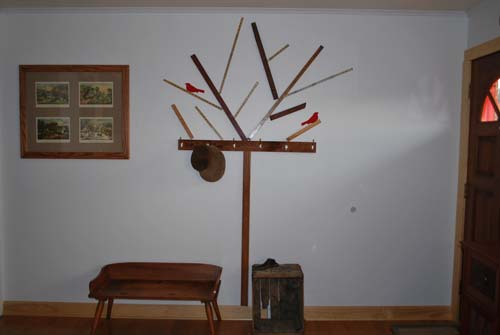
And there you have it – easy as pie. I’m very pleased with how it turned out. You could customize this to fit your home. If you’re going with a modern look, you could use metal pieces (screw them in the wall). You could also paint all your wood pieces so they were the same color. Anything goes!


I just gotta say that I love your writing style. I got a few giggles out of this post!
Thanks Janelle! 🙂 I write exactly how I speak.
This is so cute! We rent, but I’m thinking of doing a tall, skinny version of this on the side of a bookshelf we have near the door.. hmmm!
That’s a great way to make it your own! I’m sure your landlord will appreciate it. 🙂
Love it!! I cannot wait to show my husband this. I want to make it for our new home that we will be moving into soon. There’s a funky coat rack in the laundry room that I was debating whether to leave or take down. Well, this little post answered my question! Thank you for such a great idea.
I hope you’ll send me a photo when you’re done!!! 🙂
Really looks nice.
Thank you, JD. 🙂
This is such a cute idea Stacy! I am looking for DIY ideas for the mudroom (which is an extension of my foyer so it needs to look nice) and I think this is a great idea!
If you do it, you better send me a picture!!! 🙂 I still want to see the inside of your house.
This is such a great idea! I had never heard of one before…and it looks even better in person! 🙂
Flattery will get you everywhere. LOL
How cute! What a neat idea, Stacy!
🙂 Pinterest is just rockin’.
What a cute, simple idea!
Simple is how I roll!
Stacey, you are so creative. I never know what you will do next. Thank you.
Barry never knows what I’ll do next either – I think that might scare him. LOL
This is so cute! I love it! Pinning now… 😀
Thanks Beth! 🙂 I love Pinterest!