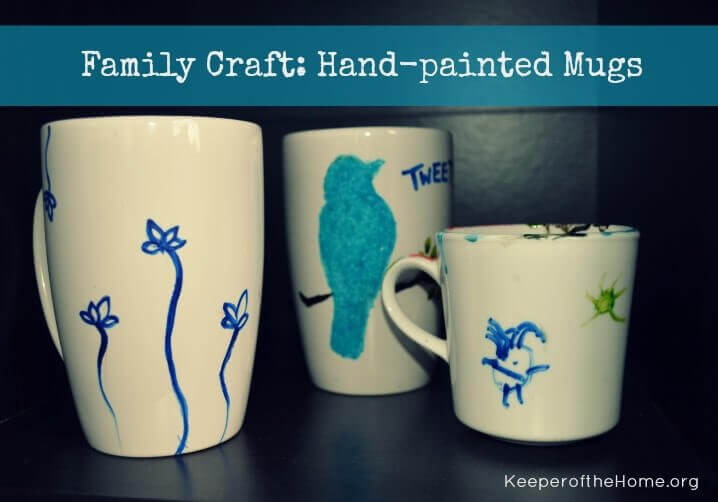
Family Craft: Hand-painted Mugs
By Stacy, Contributing Writer
When the cold days of winter seem to drag on, a family craft can be a welcome distraction. Yes, crafts can be messy, and even a little chaotic, but the act of working together to create something beautiful is fun and fulfilling (as long as you keep things fairly simple).
Besides being simple, the nice thing about making hand-painted mugs is that the end product is useful and not just clutter (which, let’s face it, some crafts are)!
How to paint mugs
Before I explain the basic steps, here are a few important tips to keep in mind:
Use china paint, such as Porcelaine 150 – it is designed specifically for ceramic, metal, glass (this paint comes in small tubs, and also pen/marker form. The pens are fun to use to write or draw simple images on the mug). I purchased my paint in a small kit at Michaels, using a 40% off coupon (be sure to check your craft store, many have coupons every week).
You could even purchase chalkboard paint (specifically designed for use on ceramic) and create mini chalkboards on each mug!
Beware of “painting mug” kits from craft stores. Many have small print which states the mugs should not be used, but are only for display.
If using multiple colors, wait for one color to dry before applying the next color.
This is a fun craft activity for older kids to complete without much help, however, if you have a toddler or preschooler who wants to be involved, you will need to provide some assistance, since it’s fairly easy to smudge colors before they are dry.
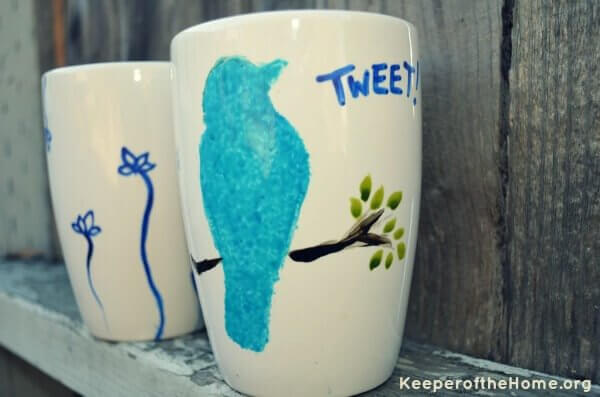
Keep it simple. You don’t have to consider yourself an artist to make a pretty mug. Basic designs like polka dots, or squiggly lines around the top and bottom of the mug, are easy and still produce a unique design that will be enjoyed.
Stencils can be used to create pictures or words. I recommend using smaller stencils, as it can be difficult to manipulate larger ones on such a small surface (as you might notice in my picture below). If using stencils, purchase a stencil brush or foam pouncer and use a tapping motion to apply paint.
It is possible to transfer outlines of images to the mug before painting, using transfer paper. Here is an excellent tutorial showing how to do that to make an monogram mug.
Let’s get started. . .
Gather supplies.
You will need:
- Paper to cover work surface
- China paint and/or paint markers
- Plain mugs (basic white mugs from the thrift store are perfect)
- Jar with water
- Paint brushes
- Stencil, stencil tape, and stencil brushes or foam pouncers (might be better for ceramic), if using
- Oven – well don’t gather the oven, but yes, be sure you have one. These mugs need to bake to set the paint

What to do:
Cover the work surface with paper and set out the mugs (be sure they are clean and dry) and other supplies.
Paint mug with desired image or design, allowing paint to dry before applying new colors. If a mistake is made, wipe off the paint with water and a paper towel or sponge.
If you’re helping a little one decorate the mug, have them paint a little at a time to avoid lots of smudges. My 4 year old (pictured above), drew the body and let it dry before adding the hair, arms, and legs.
Once you are happy with the design, let mugs dry.
After 24 hours, bake mugs in the oven at 300 degrees F for 35 minutes (instructions will be included with the paint). It is best to put mugs in a cold oven and allow them to heat up as the oven does.
Be extremely careful when removing mugs from oven.
Enjoy drinking out of your one-of-a-kind mugs!
If you need some other family-friendly craft ideas, try making bookmarks from old jeans, handmade books, or having a family draw.


I received a hand-painted mug for Christmas and LOVE it. Now i know how to make them for gits. Thanks so much for sharing. Pinning! 🙂
Great idea! And cheap & easy for a gift too!
Love the idea of using stencils! I hadn’t thought of that trick. Looks like a fun project to do on one the many snowy weekends we still have left!
These are super cute and will make great gifts for coffee/tea loving grandparents.
Because of people like you the internet is worth it!!! Thank you so much for the thorough explanation, my toddler was able to make his for xmas presents…