Preserving Summer’s Bounty: Tomato Canning Tutorial
I know that canning is a daunting process to many. It was for me, too, until my sweet friend Jen took one summer day about 5 years ago to teach how to do it myself.
Once you see how someone else does it, the whole process begins to be demystified. My goal in showing you this tutorial is to remove the “I can’t do this” element of canning, and show you just how simple and do-able the process really is!
How to Can Diced Tomatoes Using the Boiling-Water Bath Method
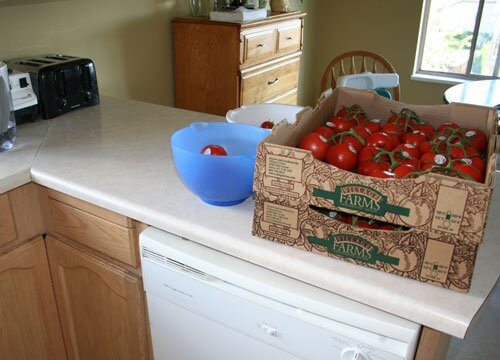
Canning day begins. I don’t remember exactly, but I think I began with around 50-60 lbs of tomatoes (a mixture of my own garden toms, as well as some from the produce market). Notice the cleanliness of the kitchen and its surroundings. 🙂
Here’s what you’ll need:
- Tomatoes. It takes about 2 1/2 to 3 lbs to fill a quart jar, so either figure out how many lbs you have and plan your jars accordingly, or decide how many jars you’d like to make, and buy that many lbs of tomatoes.
- Mason jars
- Canning dome lids
. These are the flat lids that usually come in boxes of 12. Any brand will do, so long as you have the right size (wide mouth, regular, etc.). ALWAYS use new lids, never re-use old ones.
- Screw bands for each jar.
- Lemon juice
- Sea salt
- Canning funnel (not absolutely necessary, but it makes it easier)
- Jar lifter (these ARE necessary, for safety reasons)
- Cookie sheet
- Kitchen towels and washcloths
- Canning pot, as well as a smaller pot
- Several mid-size bowls, a strainer, and a slotted spoon
Getting Started
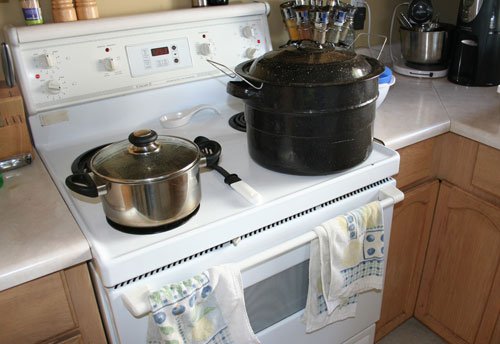
The first thing to do once your space is all clean and ready to go is to prepare the pots that you will use. It takes a long time for a huge canning pot full of water to begin boiling, so you want to get on that right away.
The pot on the right is the one that I use for the actual canning. The small one on the left I use for peeling the tomatoes.
I fill my canning pot most of the way full to start off with, because the water level will go down as it boils away, and you can always take some out, but if you don’t start with enough water, it takes a while to add more and get it back up to boiling.
Peeling the Tomatoes
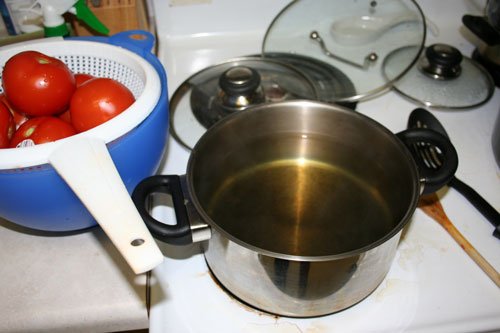
Once I get the small pot of water boiling, it’s time to begin. At the same time, I will prepare a sink full of cold water and add a tray of ice cubes to keep it cool.
I fill it up with just enough tomatoes so that they are all completely covered (or at least, very close). I use an oven timer and set it to 30 seconds as soon as they go in. Occasionally a tomato will need closer to 45 seconds, but they usually end up getting close to that by the time I hear the beep and take them out anyways.
Some people like to make an “x” slit in the skin of the tomato before boiling it, to make the skin come off easier. I don’t bother and find that the skins still come off fine. It’s your call.
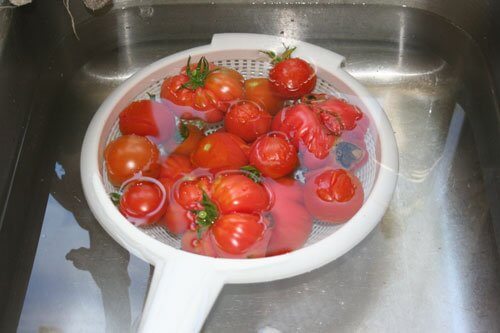
As soon as I’ve pulled the tomatoes out of the boiling water with a slotted spoon, I put them into my strainer and put the whole thing straight into my sink of cold water.
This stops the cooking process and makes them cool enough so that you can now handle them, remove the skin and cut them up easily, without a cooked, mushy mess on your hands!
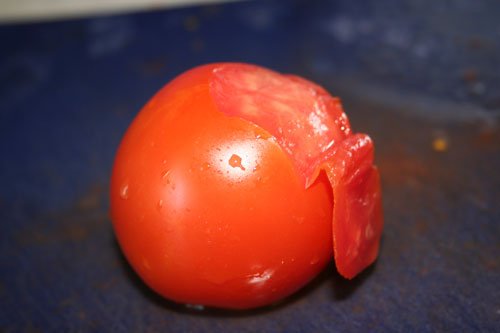
A tomato with it’s peel just starting to come off. I often start it with a small slice of my paring knife, though sometimes the skin splits on its own and slicing it isn’t necessary.
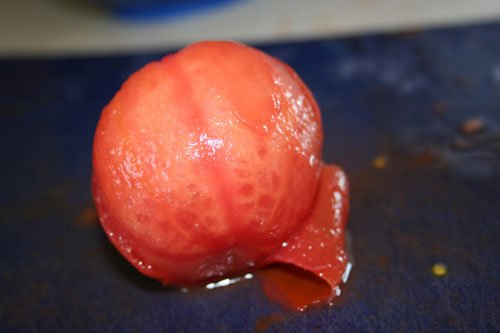
A tomato that has been peeled. Still nice and firm and intact, easy for dicing.
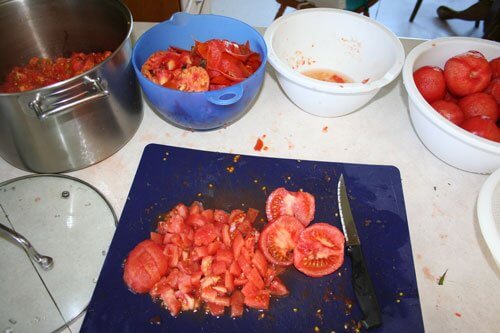
Preparing the Tomatoes
Here’s my canning setup:
- Large pot on the left, for collecting the diced tomatoes that are ready to go on the stove.
- Bowl for the compost– to hold peels, or any parts of the tomato that need to be discarded.
- I think the third bowl (I took these pictures last summer!) also held peeled tomatoes, ready to be diced.
- This bowl is definitely full of peeled, cooled-off tomatoes.
I grab from the bowl on the right, diced up the tomato on the cutting board, discard any peels or un-usable parts, then push the diced pieces into the large pot.
It’s important to note here that you will be able to move the most quickly by grouping together like actions. By this I mean that you should peel a whole bunch of tomatoes at once, then diced a whole bunch at once. Then go back and boil/cool off more tomatoes, peel them all in a group, then diced them all in a group, etc.
Once you get into the rhythm of a particular action, it goes much more quickly if you focus on that one action and process the tomatoes in batches. I find that after a half hour or hour, I really get into the swing of it and begin to move smoothly from station to station in my kitchen, and then the work really begins to go more quickly. I also happen to find that once I get into my groove, it’s quite a soothing, peaceful process… (Am I strange? Do others find this as well?)
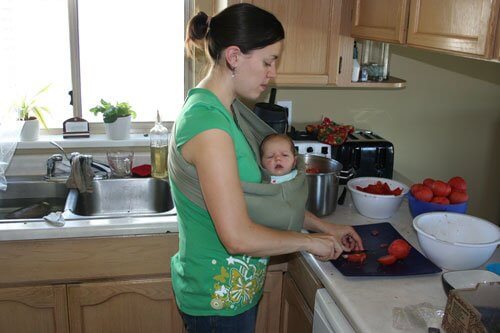
…except when I have a 4 week old colicky newborn, fussing in a sling. Ryan caught one picture of me where you can obviously see that I’m saying “shhh, shhh”. That was my canning mantra last summer, “Shhh, sweet baby. Go to sleep, Johanna. No more crying. Shhhh…” 🙂
I realize that I missed a photo, and that is of my huge vat of diced tomatoes simmering on the stove. Once I get the pot a good 3/4 of the way full, I stick it on the back burner, on low-med heat, and continue on with my peeling and dicing while I occasionally stir and let the tomatoes get good and hot.
Get Your Jars and Lids Ready
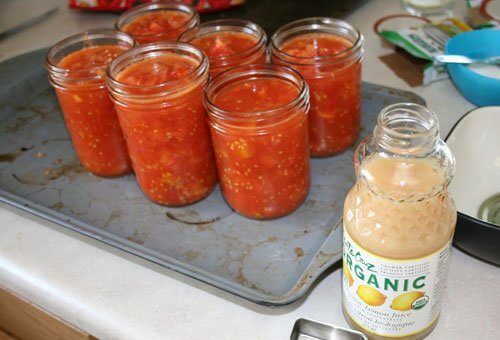
Meanwhile, turn the oven on low (maybe 200-250), get out a cookie sheet, and put your clean, empty jars on the sheet. I like to pop mine into the oven for about 5-10 minutes before I fill them up with tomatoes, so that they are nice and warm before going into the Boiling-Water Bath.
This helps to prevent them from cracking once they’re in there, which is a frustrating waste, not to mention a mess. Heed my advice, ladies. Pre-warm your jars, even though you’re cooking your tomatoes first. It’s worth it.
While you’re doing this, get out a small saucepan or pot, and bring a couple inches of water to a low boil. Take the canning lids that you are planning to use (the flat dome lids) and put as many as you need for your first batch of jars in the hot water. Leave them for 5 minutes, then you can either let them stay there or take them out and put them on a clean towel. Those little magnetic canning wands are handy for this job, but I make do without one.
Fill Up the Jars
Take your cookie sheet out of the oven when you’re ready to fill the jars up. Using a canning funnel, fill each jar up until it is almost full.
Remember to leave headroom (this is the space at the top, between the rim of the jar and how high the tomatoes come up). A 1/2 inch of headroom should be sufficient.
To each of the jars add:
- Lemon juice- 1 Tbsp for pints, 2 Tbsp for quarts
- Sea salt- 1/2 tsp for prints, 1 tsp for quarts
Once everything is in the jars, give the rims a wipe with a clean, wet cloth. Now take your sterilized dome lids and place them on top of the jars. Then put on the screw caps (rings) tightly and seal those babies up.
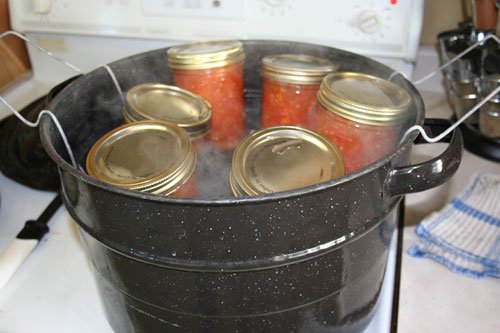
The jars are ready to go into the boiling water bath!
Set them carefully in the wire holder, while it is perched up on the edges of the pot. This helps to keep you from getting burned by plopping them in and having water splash up, and also allows the jars to acclimatize to the water temperature more gradually.
Once full, slowly and carefully lower the jars completely into the pot, until they are fully submerged. You want to have a good couple of inches covering the tops of the lids, as this is what creates the pressure that will properly seal them and preserve the food. If there’s not enough water, they probably won’t seal properly.
Process the jars (keep them in the water) for:
Pint jars- 35 minutes
Quart jars- 45 minutes
Remove the Jars and Check the Seals
After this time, carefully lift the wire jar holder up out of the water, and rest it on the edge of the pot. Use canning tongs to grab each jar and lift it out of the water, then place it down onto the folded towels on the counter.
I put mine on top of double/triple towels on the counter. These jars are HOT! They can easily ruin a counter or leave heat marks on a nice table (not to mentioning burning a perfectly lovely person, such as yourself). Be careful with them.
Now listen for the “POP!”. This is how you know they’ve sealed. You will likely hear it at some point within 30 minutes of pulling them out of the water.
You can also check after a while by gently pushing down. If the lid moves up and down or you can feel a bit of give in it, it’s not sealed. You’ll want to take the lids off, rewipe the jar rim to make sure it’s clean and then put the lid back on tightly and re-process in the boiling water bath.
I leave mine sitting out overnight, to cool off completely. The next morning I double check all of the seals, and if they’re good, I remove the rings. If I find some that aren’t quite sealed, I decide whether to just use them quickly (if it’s only a couple jars- I can make a freezer meal or some spaghetti sauce for the freezer).
If there are more than 3-4 jars not sealed, then I’ll fill my big pot back up and boil them all over again. A pain, yes, but worth it. Always be on the safe side with your canning. Never take a chance. The risks are simply NOT worth it. Ever. This is your family’s health and safety. No inconvenience or even loss of food is worth compromising safety for.
You’re Done!
Sadly, I did all that work and forgot to take a picture of my 38 completed jars of tomatoes! They were beautiful, though, I tell ya. Tasty, too. And worth every bit of the effort, and mess.
Oh yes… last step. Clean your kitchen. Sigh a few times, and maybe grumble under your breath about why you’re doing this. Look at the clock at realize it’s 10:57pm and you should be in bed. Then get yourself a small bowl of ice cream, and sit and admire your hard work. 🙂
Have you tried your hand at canning tomatoes?
Technical information is taken from Putting Food By, a very thorough resource for those who do canning of any kind. It has information on headroom, additives like salt or sugar, boiling time, altitude adjustments, overall safety and more. I still reference it multiple times each summer!



I did some canning week before last, but had too much on my plate to get done this past week. Hoping to do more this week, late in the week.
HI,
Thanks for this great post!!! Is a 1 pint jar of tomatoes about equal to 1 can (regular sized – I think 14 oz o something like that) of diced tomatoes?
What are the lemon juice and salt for?
When you put the lemon juice & salt in the jar, do you have to stir it up with the tomatoes, or just leave it on the bottom?
Thanks:)
@Jill, The lemon juice is to help ensure enough acidity for safety reasons, and to preserve color. The salt is for flavor. I don’t stir mine up, I just leave it on the bottom.
And yes, I use a pint jar as an equivalent to a regular sized can, and a quart for one of the big (28oz) cans. It’s not exactly the same amount, but it’s close enough that it works just fine.
I have canned salsa before, but not just plain tomatoes.
When I have canned (and I have room on my stovetop), I will fill an extra saucepan with water and bring that to a boil, leaving my canning pot a little less full. Then I use the saucepan water to top off the canning pot when I put the jars in. I find that this boils the water a little more quickly.
I won’t get the chance to can this summer 🙁 because all of our stuff is in storage as we are in temporary housing between a move.
Thanks for sharing!
Last year was my first time, and it wasn’t nearly has difficult as I thought it would be. My kids are good tomato peelers–they made it go much faster.
This is a great post. I’ve done tomatoes before, and will be doing them again in a few weeks…right now I’m thankful that I finished wild blueberries, peaches, and apples (I froze/dehydrated though, not canned)….I keep telling myself this WILL pay off later. Its just a lot of work now. I use the same lemon juice as you! Do you find it strong though? I tried for the first time this year using Pomona pectin to make some jam, and used the same lemon juice. The jam tasted like lemon jam! I called their “jam line” and the lady told me not to use the bottled stuff for jam. She told me to use the regular lemons, which then worked fine (no more lemon jam!) but it works great for tomatoes.
Did you see on the forum about the lady who found BPA free canning lids? I can’t remember what they were called. Anyone tried them?
I’ve been known to run out of energy and puree the tomatoes in my blender (skin and all) and freeze the puree. It works well in most things but not spaghetti sauce (too runny for some reason).
Anyone made tomato paste before? I want to try…but I know its probably taking on too much this year.
I went back onto the forum…the lids are called Tattler http://www.reusablecanninglids.com/Home.php
and they are reusable. Just in case people don’t see the post, I’m wondering if people have tried them and what they thought. Its interesting anyways.
@Nola, Those are the ones that I’m going to be reviewing and then giving away soon! 🙂
@Stephanie @ Keeper of the Home, OOOO I would love to see that review!!! I am a little too scared to buy them without knowing someone who has tried them, so this is great! I look forward to seeing the review and a chance to win!
What a great post. I am a canner also and am hosting a “Canning Week Blog Party” next week on my blog and wanted to invite you to stop by. We will be posting lots of tips, recipes, have give-a-ways and a linky party all related to canning. It is my hope to get more women educated and encouraged to put up their own produce. Hope you can stop by and link up!!!
Last year I did sweet pickles, dill pickles and peaches; my first canning experience ever!
This year I’ll do the same but also plan to do beets and you’ve got me wondering about tomatoes… 🙂
Awesome job on the tomatoes and the post!!
This is a wonderful post, there are some many canning posts lately it can be over whelming but your post is thorough and uncomplicated. I just canned pickles, jalapenos and red cabbage for the first time a few weeks ago. Now I need to figure out how to can them too!! Thanks for sharing!!
This is a great tutorial Stephanie! I especially like the instructions to eat a bowl of ice cream at the end. I’ll be sure to follow these to a “t.” 🙂
I like the sink idea. I don’t know why I have never thought of that! It makes much more sense than having a bowl of water nearby (which is the way I always do it).
I have done tomato sauce, jam, and apple butter in the past and so far this year. I am planning on expanding this year to include diced tomatoes, sliced apples, pears, and peaches and whatever else I think of. I just got a bushel of apples for $16, so it is all about apples this week. Maybe tomatoes in a few more weeks since we are moving next week! It is a lot of work, but I love having the stuff on hand all year!
wow! thanks! this actually sounds fairly do-able at some point down the road (when i have reasonably priced access to lots of tomatoes or grow them myelf…). i’m really interested in learning how to do this in the future and now i feel like i could 🙂
I definitely need to can some tomatoes, as there are several ripe for the picking in my garden right now. This is a great post.
I’m fairly new to your blog, and loving it! I’m wondering if you have ever canned soups or stews, can that be done? thanks
I loved this simple tutorial. I’ve canned a lot but never tomatoes – I usually freeze them and keep busy drying herbs, making jams, apple butter, pickles and relish. This year, I pureed them and put them in the freezer. Anyone have any thoughts on pulling them out to can them in fall or winter when the extra humidity and warmth would be welcomed. I know they’ll be less than garden fresh, but besides that they should be good right?
Thanks for the tutorial, I’m planning to put up some tomatoes today. I had a hard time finding recipes for diced tomatoes (though salsa and tomato sauce recipes are abundant!) I hope it goes well, because it’s the only way we can affordably avoid BPA in canned tomatoes. A glass jar of organic crushed tomatoes costs $3 at my store!
Quick question – is there a reason the tomatoes must be peeled? I am planning to leave them on for nutritional value.
@Milehimama, It’s fine to leave them on. I have in years past. The reason I chose to peel them last year (and probably will again when I do them in a few weeks time) is that the peels end up rolling up into little “sticks”, sort of.
They’re totally edible and they don’t really bother me too much (and depending on what you’re making, sometimes you don’t really notice them). But they’re not as nice when serving company, and my husband didn’t really care for it that way as much. So it’s entirely up to you, but I just decided that we like them better peeled. 🙂
Wow! I just canned tomatoes for the first time and can’t believe how much work it was, and for only 3 quarts and 1 pint 🙁 Thanks for posting this tutorial but I have to say that I would only do this again if I grew my own tomatoes and needed to can them because I couldn’t use them all fresh. I bought some at farmer’s market and at Savemart because they were .50/lb and I am sure it cost me more to can them than to just buy in the store. Oh well, a learning experience anyway!
@Jordan, You’re right that it is a lot of work. I won’t argue with you. What makes it worth it for me is that I do a very large amount (usually at least 50-70 lbs) all in one day, which makes it more worthwhile to go through all the fuss and mess. I also some of my own garden tomatoes, which are almost free and organic as well.
The other reason I consider it worthwhile is to avoid the BPA in the cans. We use a LOT of canned tomatoes, and I’m just not comfortable with all that BPA in our food. So even if it’s a lot of work and the savings are minimal, I would rather do it.
Plus, the longer you’ve been canning and begin to accumulate all of the stuff that you need to do it, and then combine it with doing very large batches, the cost gets less and less.
Thanks so much for this post. I’ve seen lots of directions and instructions for canning tomatoes but I found yours comfortingly straight forward, and I followed it to do my first batch of canned tomatoes ever!
I just thought I’d mention that one problem I had was that after the jars were processed, the contents was separated, with liquid at the bottom and tomatoes on top. I did some research and read that if you preheat your tomatoes too long this can happen. To be honest, I didn’t know that was a potential problem (though I honestly don’t think I heated them too long) but that’s what it said. (I also peeled and chopped some tomatoes the day before canning and kept them in the fridge….) Anyway, just if other people are trying they might want to be cautious of that. But I also read that it is no problem and you just have to shake them up before using, so no worries!
Thanks again!
@Catherine, I find that mine sometimes separate, but as you said, I just shake them up.
I actually hadn’t researched how to prevent that, but perhaps it’s just a matter of being aware of how long they’re on the stove for? Thanks for bringing it to my attention!
I am so glad to have come across your website, I am very new to canning…and tomatoes are one of the things on my “to do list”. The question I had was, have you made “Italian Stewed Tomatoes”? These are our favorite and I was hoping to make those. Any help would be LOVED and so very appreciated.
Also, can you please explain the “lemon juice and salt” at the bottom..I am lost! (Sorry)
Thanks Again for all you do
XOXOXOXOX
Tomatoes aren’t all ready at the same time, so we rinse them & just stick them in a container or bag in the freezer whole. When we have enough to can, just take them out to thaw and the outside skin just slides right off. Very easy! 🙂
Thank you for the tutorial. I am excited to get started. I don’t have a canning pot, so I will probably only be able to process 3-4 cans at a time. Do you think I can peel and dice all of the tomatoes and simmer only ones I will be able to can in one batch? Then when those are done processing, have ready enough simmered tomatoes for the next batch? I am not sure if that makes sense or will work, this is my first time!
I want to can some corn,tomatoes, and orka together…any different then canning regular tomatoes for soup later in the winter….thanks
I have a 5 gallon bucket of fresh tomatoes outside and probably 5 times that waiting to turn red 🙂 I have 2 Questions for ya! 1- Do you add anything to the pot of simmering diced tomatoes? 2- Why do you remove the rings after they sit out over night? and do you put them back on? Thanks!
I don’t add anything to the pot, just the tomatoes. And I remove the rings because I don’t have enough of them for all of my jars and they aren’t necessary to keep one once the lid has sealed and the jar has cooled. You can keep them on if you like, but I often need mine to reuse again later.
Thanks!! 🙂 I am canning today! Super excited!
Hope it goes well! 🙂
I started last canning last year. Made lots of grape jelly, salsa and a few quarts of tomatoes. This year the garden exploded with romas and a fair amount of cucumbers and a plague of summer squash. So far this year I have made 42 half pint jars of salsa, 12 quarts and 16 pints of B&B pickles and 11 pints of dill. Haven’t really put a dent in the tomatoes yet. No grapes this year, but the neighbor has a lot and said I can come on over and pick. I love canning and preserving food. Saves money and there is great satisfaction in knowing we grew it ourselves without the use of pesticides. I also grew onions that I hope will lastr through most of the winter, and froze 5 gallons of summer squash for soup when it gets cold. Love your pics of what you do in the kitchen. A wise old home canner told me you always take the rings of the jars so if any go bad you will know because they will either leak or explode!!! I’ve been lucky so far-no bad jars.
I cant tell you how happy I am to find this post. I canned for the first time last year with my mother and this year am doing it by myself. Wanting to remember everything I was supposed to do, and wanting to dice instead of just doing tomatoes whole, I went searching and found you. You are very clear in your directions and my canning was a success thanks to you. Have a great day. Correna
Just checking about the cooking of the tomatoes……the purpose of this is just to heat the them?
Right, it’s more about having them hot than about cooking them.
I made some salsa yesterday, but it was very late before I was actually able to can it, so I accidently left the salsa all cooked and ready to can on the stove overnight. Will it be safe to can and eat still?
I think it will be if you heat it up again, and bring it to a boil. Just in case (besides, it’s easier to can when it’s warm than doing a cold pack anyways).
thank you, thank you for your response:) I put it in the fridge while I was at work today and will boil again when I get home. It smells so good, I was afraid I going to have to pitch it:(
I want to start to can tomatoes I was wondering what is the shelf life of the canned tomatoes.
how do you sterilize your jars? boil them or does the “in the oven” take care of that process?
DId this for the 1st time last night w/ 15 lbs of tomatoes, thanks for the easy instructions 🙂
Thanks so much for sharing. I am just getting ready, for the first time, to can my tomatoes. I know this is probably a silly question but you say ” leave mine sitting out overnight, to cool off completely. The next morning I double check all of the seals, and if they’re good, I remove the rings. ” What do you mean by removing the rings? Thanks so much!